Thursday, January 20, 2011

Remember!


Remember to always put the camera away, or this is what happens!  LOL

Saturday, January 15, 2011

DIY Easy Large-Scale Artwork

Our son wanted a Lightning McQueen room a couple of years ago when the movie was still fairly new.  Our budget for the bedroom was fairly limited, and I was fairly choosy about what would go in the room.  He received some of those Crayola giant colouring pages as a birthday or Christmas gift, and while we were colouring them, I had a great idea! 

Background: I had previously purchased posters and had them mounted.  I had loved the look then and knew that at some point I would revisit this idea.

The BIG Idea:
Colour the pages in their entirety (son & me), mount the colouring pages ourselves (aka hubby), and create a deep wooden frame (also aka hubby).  Then paint the frames in a matching or coordinating colour to the bedroom!  We mounted the paper using spray glue on thin plywood, and then modge podged the top of the paper.

We had done a double stripe along the base of his room.  Main room colour was yellow, and the stripes were red and blue - we closely colour-matched these actual Lightning McQueen colours.  So we did the frames in the blue and love how it all turned out!!

Big impact for practically nothing!


I am linking up to some great parties:

Check out the Lightning McQueen bed by clicking here!

Linking up with some great parties! 

Wednesday, December 22, 2010

Use Cardboard Rolls for Wrapping Gifts

I made a lot of jewelry for gifts this year and instead of buying jewelry boxes, I used cardboard tubes. Toilet paper tubes are the perfect size and paper towel tubes would work well too.


Wrap your small gift in tissue paper and place inside cardboard roll. (A magazine rolled inside a long tube would be great!)


Place roll on wrapping paper and tape in place.


Roll up, tape, and leave ends open. Use curling ribbon to tie off each end.


Add lots more curling ribbon! I think this is so cute - it looks like a huge wrapped candy! :)


Tuesday, December 21, 2010

DIY Baking Mix Gift

Here is a super cute, last minute gift that you can make yourself with supplies you likely have in your pantry and gift wrapping room. (What? No gift wrapping room? Me neither. Next house, I guess!)

What you need:

Dry ingredients
Cellophane bags (I used cone-shaped)

Curling ribbon

Card stock


Optional:
Gift bag

Tissue paper


Instructions:

1. Find a favourite recipe, mix dry ingredients, and pour into cellophane bag. Use a twist tie to close bag tightly. Use lots of curling ribbon!

2. Type out baking instructions and print on card stock.

3. Attach recipe to curling ribbon. Ta-da! Great gift for all!
4. Optional: place in gift bag and cover with tissue paper. Good idea for those traveling so nothing in the car pierces the bag!


My recipe is my go-to favourite shortbread recipe from here. I printed four recipes to one sheet of card stock. Practically zero cost, very thoughtful, and definitely something the receiver will enjoy!


Monday, December 20, 2010

One Garland, Five Ways

I have used a swath of fabric instead of a traditional garland for three Christmases now, and I love it so much that it stays up year round (minus the decorations)!

All Season Style
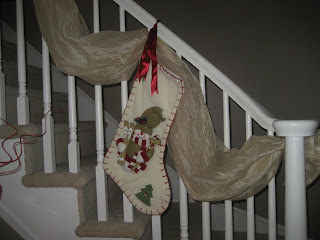
Here she is, in all her wonderful splendor! The fabric is a dark ivory crushed sheer satin, and I originally used it as a super long curtain swag. I used little bits of ribbon to tie it to the staircase.

Vintage Christmas Style
This wreath is a dark ivory bottlebrush-style base with small penny-sized red bulbs. Add a ribbon for a touch of flair and to match your Christmas style. Gingham is perfectly vintage-y!

Classic Christmas Style
Nothing says classic Christmas like snowmen and stockings with giant stitching! This is my son's stocking and it looks super cute hanging with the fabric. Some dark red satin ribbon ties it up on the staircase. So festive!

Transitional Christmas Style
I bought these 3D stars several years ago at Pier 1 Imports. These stars get used in a different way every Christmas - this year, I have a gold star as a tree topper! I love that they can be used so many ways and match so many styles. Use a bit of ribbon to tie them to the staircase and add some punchy ribbon behind to match your colour palette.

Contemporary Christmas Style
I absolutely adore these fluffy feather balls! I bought them last Christmas and they have been living in a large vase ever since. I had just enough to go on each swag! I love it!! This one may be getting a repeat performance next year!

Wednesday, October 20, 2010

DIY: What's Old Is New Again: Crepe Paper Party Decor

I am pretty sure that the last time I had crepe paper at a party was when I was about 3. I have never really used it for anything but my friend begged me on her hands and knees asked me to help her do a 65th birthday party for her mother. On zero budget.

So out came the crepe paper from the dollar store and here is what I came up with. I am calling it my "Crepe Paper Installation" since that sounds so artsy and fun!! Ha!

Here is a close up. All you have to do is cut matching lengths of crepe paper and tape them side-by-side. The wood is actually doors to a white board behind it - the crepe paper on the left door is all twisted one way, and the paper on the right is twisted opposite. I love how it turned out!


I am linking up with these parties!

DIY Custom Bling Card

Supplies:
1 package plain cards (mine came in an 8-pack for $1)
1 package adhesive rhinestones ($1)

Time:
20 minutes

Directions:
Just attach rhinestones to your card in a decorative pattern!

I made a crazy-looking 'M' on the envelope for the recipient's initial, and a '65' on the card for her age. Add a sweet, personalized note inside and you have a gorgeous, one-of-a-kind card!


I am linking up with these parties!

Related Posts Plugin for WordPress, Blogger...