Monday, February 28, 2011

Millenium Falcon Cake

I think I had heard of Star Wars once or twice before I met my husband.  Now I am quite well acquainted with it, in my opinion. Haha!  I have only been forced to managed to watch Episode 4 though.  Or whatever number was the first one ever made.  My hubby has passed on his Star Wars love to our son, who decided that it would be a great (ie. super galactically fabulous!) theme for his birthday party.  So here is how I made his cake...

Step one:
Trace your outline onto plywood or other base.


Step two:
Cover the entire thing in tinfoil.  We don't want any slivers in the cake!!  I put a ruler on top just so you can see the size of this thing!


Step three:
Bake cakes, and cakes, and more cakes.  This took FIVE cake mixes to cover!!  Then whip up some buttercream (I made three batches of cream cheese buttercream tinted grey) and start covering the cake.  Make sure you build it up in the middle.


Step four:
Make your fondant and start covering everything.  You may want to cut out some additional pieces for some areas to give more of a 3D look.
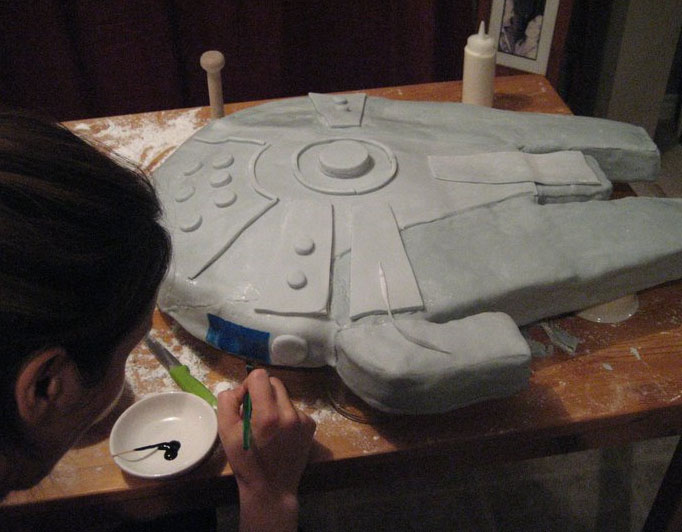


Step five:
Now for the time-consuming stuff!  Everything up to this point is the quick stuff.  Yeah, right!  No, seriously!!  Start decorating!  I used red, blue, and black gel colours to paint some areas of the cake.  Let the gel dry a bit before piping your icing.  I made a royal icing recipe to ensure everything hardened up and stayed beautiful!  So pipe, pipe, and pipe some more!  When you are done piping, go back and pipe more.  Trust me.

Also, it helps if the cake is sitting up off your table.  Notice mine is sitting on top of bowls flipped upside down.  Having it up in the air helps you decorate all the way to the bottom.


Step six:
Let it dry overnight.  This will be helpful especially for the gel colours.


Step seven:
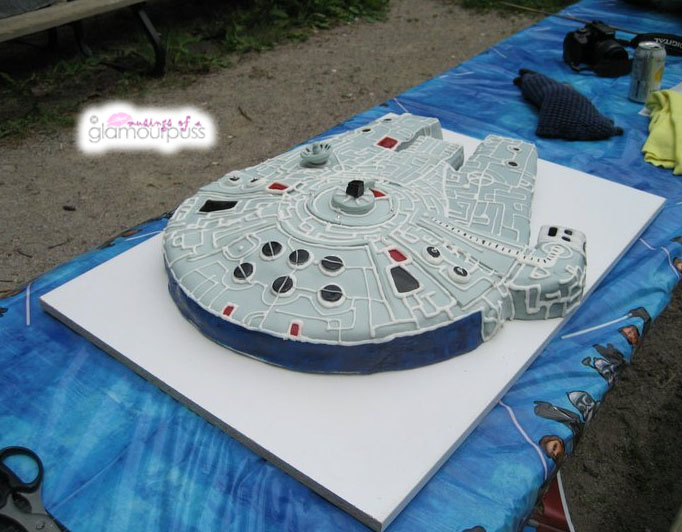
Now deliver to party site and admire!  We had to lay ours flat for delivery and I ended up not raising it back up off the table.  But no one minded that at all!  Here are some close ups!


PS  If you are wondering how long this took, I started in the afternoon and had some breaks.  Plus baking time (I only baked one cake at a time and had to bake five).  I finished up somewhere around midnight.  Yes, I really love my kids! :)


Linking up with some great parties!

Friday, February 25, 2011

Crazy Pink & Green Cake

Last year, I made a cake for my friend's birthday.  She is a super fun girl, so we had to have a super fun cake.  I was thinking of those cakes that are all off-kilter, and wanted to try my hand at that.


Crazy layered cake - lime and vanilla flavoured layers with cream cheese frosting and raspberry flavoured fondant.  Add in some coloured sugar, feathers, and pinky pearl luster dust, and this is what we get:


Tuesday, February 22, 2011

Handmade {Valentine} Cards II

In case you missed the first post, you can read it here.

Supply list according to card:
1. hand ripped construction paper, ribbon, beads, wire, large safety pin (this one was for an adult; no pins for kids!)
2. ruffled lace with thread, ribbon, foam hearts
3. red tulle, ribbon, foam hearts, pen
4. hand ripped construction paper, ribbon, foam hearts, pen
5. foam hearts
6. hand ripped construction paper, kitchen twine, foam hearts
7. ribbon (I wove it picnic basket style), foam hearts
8. pink striped clear packing tape, hand ripped construction paper, ribbon, foam hearts
9. pink tulle, pink striped clear packing tape, hand ripped construction paper, ribbon, sequin/bead trim
10. red tulle, ribbon, kitchen twine
11. silk flowers
12. lace, ribbon


Monday, February 21, 2011

Out with the Old, In with the New

This is what I keep seeing:


This is what I want to see:


{fingers and toes crossed}

Sunday, February 20, 2011

Handmade {Valentine} Cards I

Well, I made these in time for Valentine's Day but didn't get them posted.  Oh well, I am just super duper early for V Day 2012!

I cut cardstock paper into 4 pieces and used a hot glue gun to attach everything.  This is where the box of vintage buttons and zippers that I got from my grandma came in handy.  I bought nothing - everything was already in my house.  We wrote on the backs and taped a chocolate heart on the back of each one.  I did spend $1 or so on chocolate hearts.  

My kids had a great time handing these out!


Supply List according to card:

Card 1: hand ripped construction paper, vintage zipper
Card 2: organza, thread
Card 3: hand ripped construction paper, ribbon, foam heart
Card 4: ribbon
Card 5: ribbon, vintage buttons, foam hearts
Card 6: red tulle, hand ripped construction paper, vintage zipper
Card 7: red tulle, ribbon, linen, vintage button, glitter
Card 8: kitchen twine
Card 9: red tulle, hand ripped construction paper, ribbon, foam hearts 
Card 10: pink tulle, ribbon, vintage buttons


I have more cards to post, so stay tuned!

Linking up with some great parties!

Saturday, February 19, 2011

Gumball Necklaces

Supplies:
Ribbon
Darning needle
Thread (if desired)
Lighter or lit candle
Gumballs (I used 10 per necklace)
Metal skewer

Directions:
1. Using the metal skewer, gently poke a hole into the gumball.  Once the skewer is through, lightly press it into the other side to make a faint indentation mark on the outside.  Remove skewer, turn gumball over and you should be able to see the indentation mark you made.  This is where you want to make the second hole.  Once you have made the second hole, your gumball should look like a bead.  Repeat for all gumballs.

2. Cut your ribbon to desired lengths.  I used two pieces (for necklace length) about 16" each.  I also cut several 4" pieces to tie in between each gumball.  Heat seal all ends using your lit candle or lighter.

3. Thread the needle.  Make sure it is doubled for strength.  Tie off the ends into a double knot.  Sew the thread several times to the end of one of your LONG pieces.  You can fold the end of the ribbon into an accordion and sew through it if you want it extra strong.  Now thread all the gumballs.  Don't tie off the thread.


4. Tie and knot a SHORT ribbon length in between each gumball.  Now you are going to sew the other LONG ribbon piece on, following the instructions above.  Finally, tie a SHORT piece where the LONG ribbons meet the gumballs.  

All done!  Wrap up in a jewelry box or organza bag for gift giving.  These would be great favours for a birthday party.  Enjoy!


Linking up with some great parties!

Friday, February 18, 2011

Lightning McQueen Bed

For his Lightning McQueen room, my son needed a race car bed.  I wanted a bed that would fit a twin mattress, and the molded plastic car beds from Toys'R'Us and the like were all made for toddler mattresses.  Plus, they weren't really Lightning McQueen, just red race car beds.  

Hubby to the rescue!  He probably was wearing his Superman shirt that day haha!  He laid out a large sheet of 5/8 inch MDF and I covered it in wax paper.  The wax paper became my pattern paper.  I used my son's large talking McQueen toy, the DVD cover, and a scene from the movie (which we left on pause), and I drew out the entire side of the car.  The only area I redid a couple of times was where the driver and passenger window go.  It had to be high enough so he wouldn't fall out of bed, but low enough to allow easy bed changing access and for him to easily get out of bed.  Plus, it had to look sporty without looking like a convertible.

HubbyWe did two layers of MDF in some areas: all 4 tires and large and small lightning streaks.  My hubby cut it all out with his table saw and then went over each edge and side to round them off.  If he wasn't asleep right now, I would ask him what the tool is called.  I can't remember.  We used the red accent paint from my son's room and bought some new paint in yellow, orange, black, and silver.  A paint gun helped hubby us get the blends on the large lightning streaks.

End result: We all love it!  And, most important, when my son walked into the room to see it for the first time, he said, "Lightning McQueen!"


For the matching artwork we did, click here!

Linking up with some great parties!

Wednesday, February 2, 2011

This Table Has a Secret

Way back when, I did 3 posts on the glam nursery that we did for our sweet little girl.  I forgot to add the "DIY" (not sure you can really call it that, but hey, that's what I'm going with!) for the table.

It is actually the most expensive thing in the room, but I did it for free! 

Here is how I did it:

1. Shop your closet and find a long skirt or sarong.  The one I used is a vintage black silk pleated skirt: Ralph Lauren Purple Label.  This is an ankle-length skirt so once it is on the table, it leaves about 6 inches or so draping on the floor.  I think it is so romantic-looking like that!


2. Shop your kitchen or dining room and find a round tray or charger.  Mine is a large silver serving tray.  A vintage round tray would look great too!  Just make sure that there are no sharp edges or cutouts that could snag your fabric.  Your mom or grandmother might have some vintage silver trays laying around that would work well.


3. Set up a decorator table.  You know the kind: made of wood, collapsible, round top.  I have also seen people use a metal garbage can flipped upside down.  Good idea if there are no handles - hello, tripping and toe-bashing.  Not good news!  Plus, take into consideration the height of the table/can/other base.  Make sure it's not too high to reach over and put your book or drink down.  No one wants to reach up.


4. Skirt goes over table.  Charger/tray goes over open waist area.  Super simple!  Don't look at the lamp.  It is the DIY from you-know-where.  I got this great idea to weave ribbon through it and at halfway through, I have gone through well over 50 yards of ribbon.  Plus the whole thing annoys me to no end.  So that's that.

Viola! Decorate your table as you wish!!


For more about the nursery:

Read part 1 here.
Read part 2 here.
Read part 3 here.
Read about the mobile here.

Linking up with some great  parties!

Tuesday, February 1, 2011

DIY Custom Crib Mobile

What You Need:

1. Skinny ribbon to match room colours, precut into 18" - 24" lengths
2. Small trinkets: beads, pearls, vintage buttons, keys, fuzzy pom-poms, etc.
3. Darning needle
4. Netting canopy

Directions:

1. Thread the needle with the ribbon.  Tie one end of ribbon into a knot.  This will hold your trinket in place.
2. Thread through your trinket.  Push it down to the knotted end of the ribbon.  I used two colours of pearls for mine.
3. Thread through netting, remove the needle and tie ribbon in a knot to secure the ribbon onto the netting.  I finished off my ends by making a bow.
4. Repeat as many times as you like!


I found it helps to take the netting down from the ceiling and work with it on the floor.  No sore arms that way!


For more about the nursery:
Read part 1 here.
Read part 2 here.
Read part 3 here.
Read about the table here.

Linking up with some great parties!

Related Posts Plugin for WordPress, Blogger...