Showing posts with label holiday. Show all posts

Wednesday, November 23, 2011

Turkey Stuffing Recipe

Ingredients:
Day old bread, cut or ripped into bite size pieces (1 loaf for chicken, up to 2 for turkey)
Butter, all but 2 TBSP melted (1/2-3/4 cup for a chicken, 1+ cup for a turkey)
Onions, chopped (1 for chicken, 2 for turkey)
Celery, chopped (1 stalk for chicken, 2 for turkey)
Parsley
Rosemary
Sage
Thyme
Salt & pepper to taste

Extras:
Fresh or dried cranberries
Diced apples
Raisins
Diced carrots
Nuts

Directions:
1. Place bread pieces in a large bowl and drizzle with butter.  Pour 1/4 of the butter over the bread and stir to mix.  Repeat 3 more times.  This ensures all the bread gets evenly coated.


2. Mix in the celery and onions.  Add any extras as well.  It should be smelling good already!


3. Add in 1 TBSP each of the herbs.  Add a pinch of salt and pepper as well.  


Mix until everything is well blended.  Take a little taste and adjust herbs as desired.


4. Make sure the bird is cleaned out.  The chest cavity should be empty.  


Stuff the stuffing mixture into the cavity and don't be shy about pressing it in!  


Extra stuffing can go in the other end where the neck was.  


5. Tie up the legs and wings if desired (I didn't) and place bird in a roasting pan.  Rub all over with remaining soft butter.  Bake!

Linking up with some great parties!

Tuesday, February 22, 2011

Handmade {Valentine} Cards II

In case you missed the first post, you can read it here.

Supply list according to card:
1. hand ripped construction paper, ribbon, beads, wire, large safety pin (this one was for an adult; no pins for kids!)
2. ruffled lace with thread, ribbon, foam hearts
3. red tulle, ribbon, foam hearts, pen
4. hand ripped construction paper, ribbon, foam hearts, pen
5. foam hearts
6. hand ripped construction paper, kitchen twine, foam hearts
7. ribbon (I wove it picnic basket style), foam hearts
8. pink striped clear packing tape, hand ripped construction paper, ribbon, foam hearts
9. pink tulle, pink striped clear packing tape, hand ripped construction paper, ribbon, sequin/bead trim
10. red tulle, ribbon, kitchen twine
11. silk flowers
12. lace, ribbon


Sunday, February 20, 2011

Handmade {Valentine} Cards I

Well, I made these in time for Valentine's Day but didn't get them posted.  Oh well, I am just super duper early for V Day 2012!

I cut cardstock paper into 4 pieces and used a hot glue gun to attach everything.  This is where the box of vintage buttons and zippers that I got from my grandma came in handy.  I bought nothing - everything was already in my house.  We wrote on the backs and taped a chocolate heart on the back of each one.  I did spend $1 or so on chocolate hearts.  

My kids had a great time handing these out!


Supply List according to card:

Card 1: hand ripped construction paper, vintage zipper
Card 2: organza, thread
Card 3: hand ripped construction paper, ribbon, foam heart
Card 4: ribbon
Card 5: ribbon, vintage buttons, foam hearts
Card 6: red tulle, hand ripped construction paper, vintage zipper
Card 7: red tulle, ribbon, linen, vintage button, glitter
Card 8: kitchen twine
Card 9: red tulle, hand ripped construction paper, ribbon, foam hearts 
Card 10: pink tulle, ribbon, vintage buttons


I have more cards to post, so stay tuned!

Linking up with some great parties!

Saturday, February 19, 2011

Gumball Necklaces

Supplies:
Ribbon
Darning needle
Thread (if desired)
Lighter or lit candle
Gumballs (I used 10 per necklace)
Metal skewer

Directions:
1. Using the metal skewer, gently poke a hole into the gumball.  Once the skewer is through, lightly press it into the other side to make a faint indentation mark on the outside.  Remove skewer, turn gumball over and you should be able to see the indentation mark you made.  This is where you want to make the second hole.  Once you have made the second hole, your gumball should look like a bead.  Repeat for all gumballs.

2. Cut your ribbon to desired lengths.  I used two pieces (for necklace length) about 16" each.  I also cut several 4" pieces to tie in between each gumball.  Heat seal all ends using your lit candle or lighter.

3. Thread the needle.  Make sure it is doubled for strength.  Tie off the ends into a double knot.  Sew the thread several times to the end of one of your LONG pieces.  You can fold the end of the ribbon into an accordion and sew through it if you want it extra strong.  Now thread all the gumballs.  Don't tie off the thread.


4. Tie and knot a SHORT ribbon length in between each gumball.  Now you are going to sew the other LONG ribbon piece on, following the instructions above.  Finally, tie a SHORT piece where the LONG ribbons meet the gumballs.  

All done!  Wrap up in a jewelry box or organza bag for gift giving.  These would be great favours for a birthday party.  Enjoy!


Linking up with some great parties!

Tuesday, December 21, 2010

DIY Baking Mix Gift

Here is a super cute, last minute gift that you can make yourself with supplies you likely have in your pantry and gift wrapping room. (What? No gift wrapping room? Me neither. Next house, I guess!)

What you need:

Dry ingredients
Cellophane bags (I used cone-shaped)

Curling ribbon

Card stock


Optional:
Gift bag

Tissue paper


Instructions:

1. Find a favourite recipe, mix dry ingredients, and pour into cellophane bag. Use a twist tie to close bag tightly. Use lots of curling ribbon!

2. Type out baking instructions and print on card stock.

3. Attach recipe to curling ribbon. Ta-da! Great gift for all!
4. Optional: place in gift bag and cover with tissue paper. Good idea for those traveling so nothing in the car pierces the bag!


My recipe is my go-to favourite shortbread recipe from here. I printed four recipes to one sheet of card stock. Practically zero cost, very thoughtful, and definitely something the receiver will enjoy!


Monday, December 20, 2010

One Garland, Five Ways

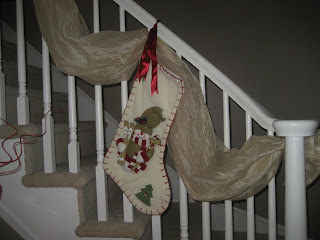
I have used a swath of fabric instead of a traditional garland for three Christmases now, and I love it so much that it stays up year round (minus the decorations)!

All Season Style
Here she is, in all her wonderful splendor! The fabric is a dark ivory crushed sheer satin, and I originally used it as a super long curtain swag. I used little bits of ribbon to tie it to the staircase.

Vintage Christmas Style
This wreath is a dark ivory bottlebrush-style base with small penny-sized red bulbs. Add a ribbon for a touch of flair and to match your Christmas style. Gingham is perfectly vintage-y!

Classic Christmas Style
Nothing says classic Christmas like snowmen and stockings with giant stitching! This is my son's stocking and it looks super cute hanging with the fabric. Some dark red satin ribbon ties it up on the staircase. So festive!

Transitional Christmas Style
I bought these 3D stars several years ago at Pier 1 Imports. These stars get used in a different way every Christmas - this year, I have a gold star as a tree topper! I love that they can be used so many ways and match so many styles. Use a bit of ribbon to tie them to the staircase and add some punchy ribbon behind to match your colour palette.

Contemporary Christmas Style
I absolutely adore these fluffy feather balls! I bought them last Christmas and they have been living in a large vase ever since. I had just enough to go on each swag! I love it!! This one may be getting a repeat performance next year!

Friday, April 16, 2010

Someone Ate the Duck's Bum


And I have no idea who could have possibly done that to my sweet little girl's leftover Easter candy kabob. Except now it is completely gone and there is no evidence left to target the perpetrator. Hmm, probably a good thing this happened while she was napping. Coincidence? I think not so.

The duck would like to apologize for his blurry picture. I took three; this is number two. It is his fault for not smiling more with his icing beak.

I should go see if maybe my son has one of these leftover too! Time to check on my baby and see if she is still napping. Yeah. That's my story and I'm sticking to it!

*DISCLAIMER* My kids got lots and lots and lots of Easter candy, so one candy kabob here and there will go completely unnoticed. Plus, it's healthier for them! ;) And, we really can't point fingers at whoever ate it. Because no one knows who for sure...

Saturday, February 6, 2010

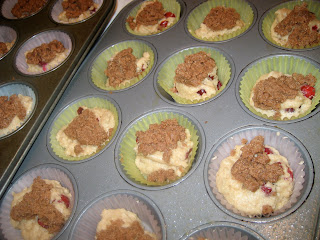
Valentine Muffins: Cranberry with Streusel

Adapted from Colleen's recipe at allrecipes:
Original recipe shown (my changes in parentheses).

INGREDIENTS:

Muffins:
1 1/2 cups all-purpose flour (I used 1 cup of whole wheat flour and 1/2 cup of all-purpose flour)
3/4 cup white sugar
1/2 teaspoon salt
2 teaspoons baking powder
1/3 cup vegetable oil (I used grapeseed oil)
1 egg
1/3 cup milk
1 cup fresh blueberries (I used 1 cup frozen cranberries, plus 1/3 cup dried sweetened cranberries)

Streusel:
1/2 cup white sugar
1/3 cup all-purpose flour
1/4 cup soft butter
1 1/2 teaspoons ground cinnamon

DIRECTIONS:

1. Preheat oven to 400 degrees F (200 degress C). Grease muffin pan or use muffin liners.
2. Combine all dry muffin ingredients.
3. Place oil in 1-cup measuring cup; add egg. Add enough milk to fill up to the 1-cup mark. Mix this with the dry mixture. Fold in cranberries.


4. For streusel: Mix all ingredients.


5. Fill muffin cups and top with streusel mixture.


6. Bake 20-25 minutes or until done. (Mine were done in 15 minutes.)

NOTE: This recipe originally yields 8 large deli-style muffins. I was able to make 24 muffins (16 regular and 8 child-size). The frozen cranberries added a wonderful pop of tartness, while the dried cranberries added some sweetness. I have made this recipe several times - sometimes following the ingredient list, and sometimes not. Chocolate works well too!


Related Posts Plugin for WordPress, Blogger...