Saturday, December 10, 2011

I Don't Have a Mantle to Decorate

Today is the final day of Creating Christmas!  It has been so fun to hook up with The Girl Creative - thanks, Diana!

 Creating Christmas at The Girl Creative


In our old house, we had a lovely wood-burning fireplace.  I loved to roast marshmallows, curl up with a good book, and just watch the fire.  Plus it was super cosy!  And I loved the fact that I had a mantle to decorate at Christmas.  


I love checking out all the beautifully decorated Christmas mantles on blogs and Pinterest, but...  I have no mantle to decorate! I make up for it by decorating the tops of bookcases, dressers, china cabinets, etc. 


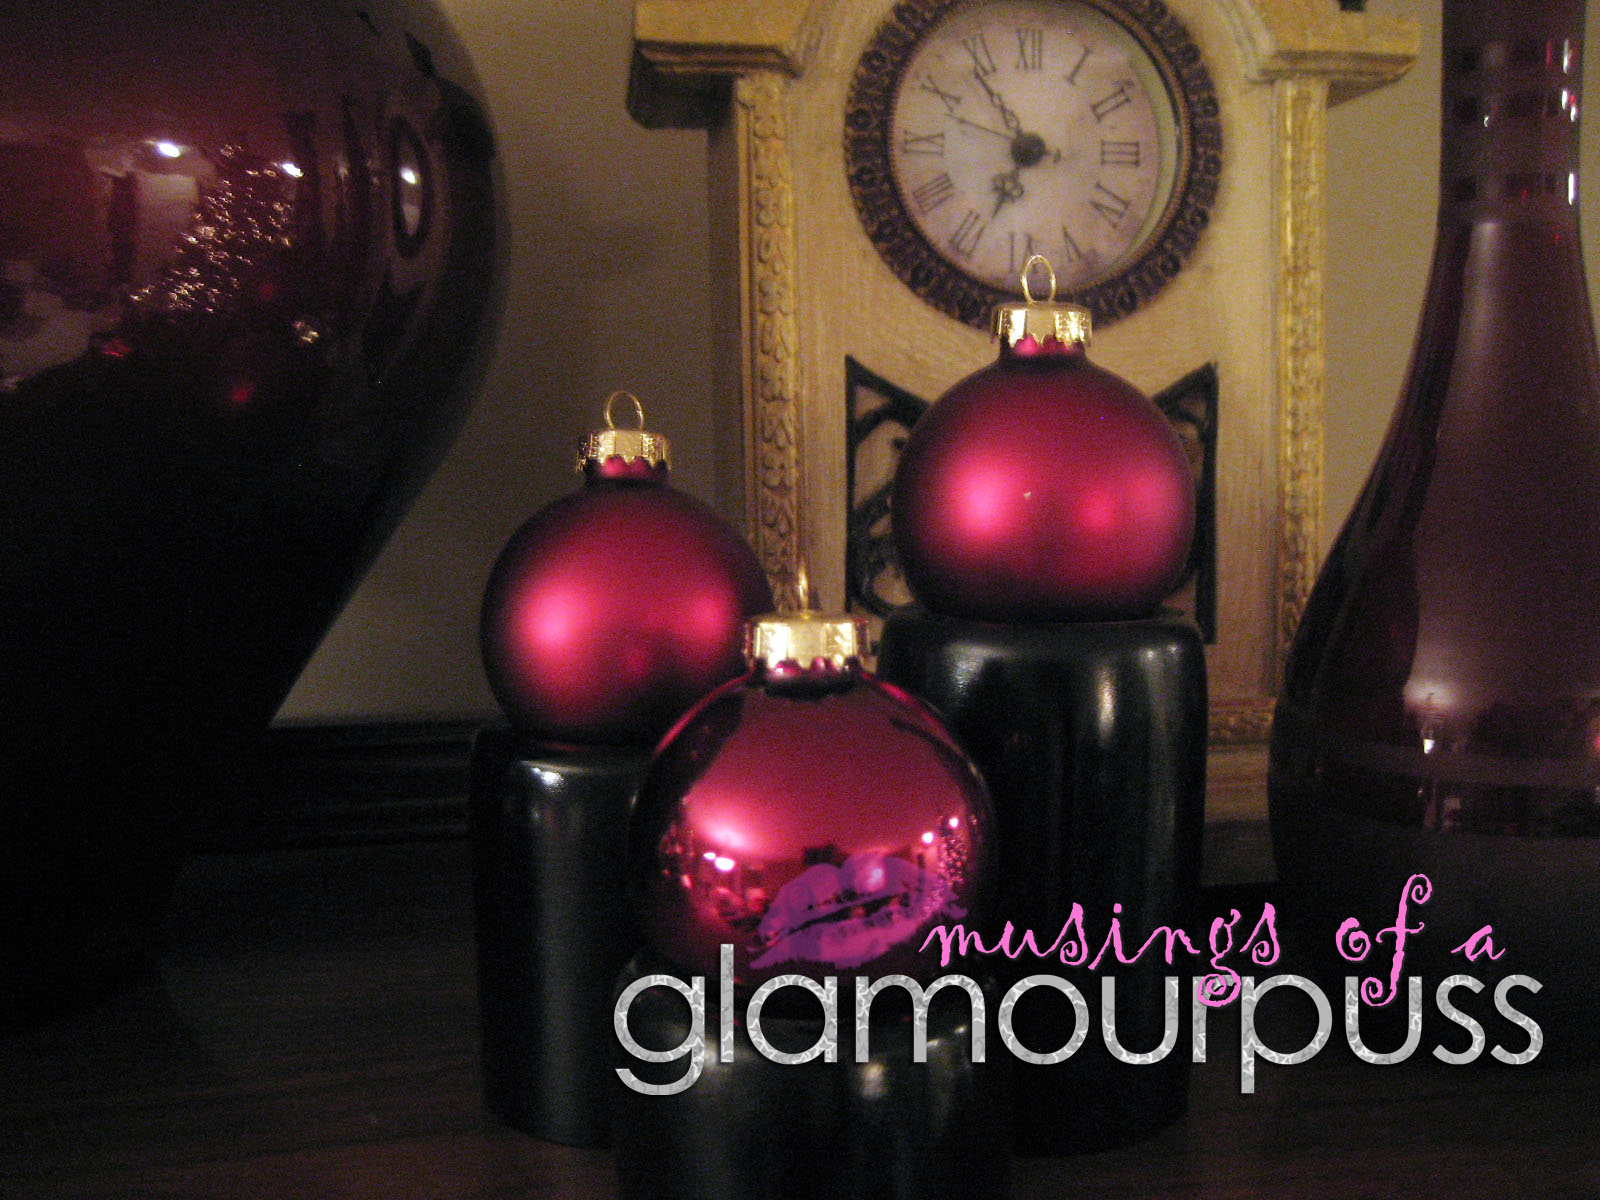
I simply swap out some of the everyday decor with Christmas balls and ornaments.  This is my grandmother's china cabinet that she gave us a few years ago.  The tall candlesticks, both red vases, clock, and black tealight holders are there year round, along with some other things I have removed until January rolls around again. 


I added a clear vase full of ornaments, a 3D silver star, and red Christmas balls on top of the black tealight holders.  I also added sheer burgundy ribbon around the tall candlesticks and a bottlebrush wreath to the cabinet door.  Now it is festive!


To this dresser, I added a bowl of Christmas balls with a few picks and a glittery ornament.  Even a couple hints of Christmas will add so much!


CREATING_CHRISTMAS_BANNER_jpg  
As we wrap up Creating Christmas week I hope that you have all been inspired to stop pinning and start creating! I’m excited to see what everyone has been working on. This Christmas Linky Party is no ordinary party. This is a blog hop. And what that means is that there are 18 FABULOUS bloggers that are hosting this party at their very own blog. Whether you add your project link here or at any of the other 17 co-hosts blogs, it will show up on one huge party list! Awesome! 

If you haven’t already, please take the time out to visit the other co-hosts and go through their Creating Christmas posts. There is some really neat projects! The Girl Creative, Que Linda Crafts, The Cottage Market, Love Lindsey, Domestic Mischief, Chicken Scratch, Love Sweet Love, Randee’s Organized Chaos, Musings of a Glamour Puss, Anastacia Knits, Southern Scraps, Modern Yet Old Fashioned, Broken Treasures, Alyssabeth’s, Domestic Deadline, Life on Walnut Street, 52 Mantels, The Glamorous Life

The Rules are SiMpLe:
  • Add a link to a project that YOU have created!
  • Visit the 2 links ahead of you and check out what they’ve got going on. Leave some comment love. Tis the season for giving after all. {wink wink}
  • HAVE FUN AND BE INSPIRED!!

Friday, December 9, 2011

Michael's Knock Off Chenille Chain Garland

Welcome to Day 6 of Creating Christmas!

 Creating Christmas at The Girl Creative
 
I was at Michael's the other day checking out all the Christmas fabulousness, and saw these:


Chenille Chain Garlands!  These are made exactly like the paper chains you made probably every single year when you were little.  Except these were basically made with pipe cleaners!

All you need is a pair of scissors and your pipe cleaners, and you are good to go!


Cut into desired length.  I cut mine in thirds.


Make a loop and twist the ends around each other.  


Thread a new piece of pipe cleaner through your loop, and loop again.  Repeat.


So cute for a kid's tree!  I think it would be awesome in metallic colours like copper and gold!


Linking up with some great parties!


Thursday, December 8, 2011

Pompom Ornaments

Welcome to Day 5 of Creating Christmas!  I can't believe the event is half over now!
 Creating Christmas at The Girl Creative
The whole idea behind this event is to create and not just pin!  Ha!  I must admit I have pinned every day this week... but I also created every day as well, so I guess that is okay.  Ahhh, Pinterest is just soooo addicting!  (P.S. You can check out my Pinterest if you click the link on in right column!)

Without further ado, here is my Christmas creation:
Supplies
Hot glue gun
Styrofoam ball
8” piece of yarn
Pompoms


Directions
1.  Glue pompoms onto Styrofoam ball, making sure each one is securely attached before letting go!  I held the ball in my hand to hold the pompoms tightly against the ball to ensure the glue was really working well!  I didn’t want any pompoms popping off later (and they haven’t).


2.  Glue both ends of the yarn to the ball for the hook.  Make sure it is covered by a pompom.


These pompom ornaments are a perfect accompaniment to the homespun ornaments on my son’s tree.  :)
 

Linking up with some great parties!

Wednesday, December 7, 2011

Homespun Style Ornaments

Welcome to Day 4 of Creating Christmas!  

 Creating Christmas at The Girl Creative


At our home, the main tree is finally almost done!  Yay!  And it smells so good!  I love the Christmas tree smell; it just makes me want to curl up in a big chair with a hot tea and a good book with only the tree lights on.  

We can't finish our tree for another day or two...  Is it just me, or do the ornament hooks disappear every. single. year.?  I even had the bag out to do two trees, then we were doing one additional tree, and off they went.  (I had two brand new boxes of hooks in addition to all the other hooks in the bag.)  Hubby had to go out to Walmart to get more, but they were sold out.  So he went out again the next day to a different store and got me two boxes.  They're all used up and I have another 30 ornaments or so left to hang...  Gotta find those missing hooks!  Ahhh!

Each one of our trees has a different theme and colour scheme.  My daughter has her pink glam tree, my son has a vintage toy inspired tree, the upstairs tree is gold and natural elements, and the main {real} tree is almost always red with metallics.  I thought I would focus my new-found ornament skills on my son's tree.  It has all the wooden ornaments from my childhood tree on it like rocking horses, nutcrackers, and angels, as well as some miscellaneous things like s'mores ornaments, Starbucks mittens (from gift cards) and hot rod car ornaments.  It's really cute, but I wanted something else to add to it.  So here is what I did...


SUPPLIES

yarn
buttons (if desired)
hot glue gun
styrofoam ball


DIRECTIONS

Begin by gluing a tiny length of yarn onto the styrofoam ball.  Begin to make a tight circle of yarn, gluing as you go.  


Keep wrapping and gluing, wrapping and gluing.  When you are almost done, cut a separate length of yarn about 8 inches long and glue both ends together to the ball.  This will become the hook for the ornament. (Alternately, once finished, just loop a length and glue it down.  Trim the end off.)


Finish wrapping and gluing.  


Glue buttons on the yarn if you would like.  My buttons are actually vintage buttons from my grandmother's button box. 


You can also wrap the yarn in different patterns, just be aware that the time will increase depending on the complexity of your pattern.  I made one with different sizes of circles and it took me about 3 times as long to cover the whole ball.


I also made one that resembles a ball of yarn.  I just wrapped the yarn in various directions all over the styrofoam ball, making sure that no white spots were showing.  Then I tied several loose pieces around the outside in order to have little yarn ends poking out here and there.


Linking up with some great parties!

Tuesday, December 6, 2011

DIY Gem Ornaments

Hooray!  It's Day 3 of Creating Christmas!  I am so glad to be a co-host with several other lovely ladies and The Girl Creative!


 Creating Christmas at The Girl Creative


Without further ado, here is today's Christmas craftiness!

I had some leftover gems from this project, so I thought some coordinating ornaments would be cute.  My daughter's tree is pink, pink, and more pink with silver.  Her ornaments are sequined and the lights are globe-shaped.  Some of the gems are teardrop shaped and her garland is silver cubes, so we are really rocking the geometric shapes here!  Ha!


Simply put an ornament hook through the gem hole (resize the hook to fit) and hang it on the tree! 


So easy and cute.  I think this would be really precious done on a tree with only beads and pearls.


Linking up with some great parties!

Monday, December 5, 2011

Old Christmas Decor in New Ways

It is Day 2 of Creating Christmas!

 Creating Christmas at The Girl Creative


This Christmas I am aiming to reuse the decorations that I have in ways I have never used them (or at least, not recently).  Here are some samples of things I made today...
A tealight holder became an modern-style ornament display for a windowsill.


When I decorate for Christmas, I sometimes reuse currently displayed vases or jars which means I have to store everything that is normally in the container.  I had dumped out a vase of red glass stones to be used for Christmas balls instead.  I was planning to store the glass stones until January but hey, they're red and it's Christmas!  I tried them in a couple of places, didn't like them, and into a jar they went. 


I pulled out my sleigh (that was filled with silver bead garland from the year before) and emptied it out.  I thought about filling it with some wrapped stocking stuffers, but I did that a couple of years ago.  So I left the sleigh and went back to the beads.

I thought the beads and glass stones might look cute so I grabbed an empty vase and started stringing the beads in.  I added a couple of stones every once in while. A sparkly red glitter Christmas ball went on top.  It's cute!  I am not sure where it is going to go yet, but I think it's a keeper!  Just something a little different.


Then the sleigh came back out and I saw some beaded stars that my daughter had unwrapped right next to the beaded fruits.  In went one apple, one pear, one cluster of grapes, and two stars.  I had one star left so it got hung on the side of the sleigh.


I placed the sleigh on a half wall and wanted a little something extra with it so I found some metallic XL tulle (leftovers from here) and some bits of raffia for a base.  Three gold mini balls in matte, shiny, and glitter were the finishing touch.  I think this is my most favourite way I have ever used the sleigh!


Linking up with some great parties!

Sunday, December 4, 2011

Lace Christmas Tree T-shirt Tutorial

It is Day 1 of Creating Christmas!


 Creating Christmas at The Girl Creative


I was planning to do a green lace tree on a white shirt with red beads but when hubby went out to the store to get me a shirt, they were all out of the white type I wanted.  So he came back with a light pink shirt and a striped pink/white shirt.  Oh well!  Thanks anyway, Baby!  So instead of classic Christmas red, white, and green, I give you vintage Christmas in pink, ivory, and tan!

Supplies:
t-shirt
lace, ribbon, tulle, or other
thread
needle
sequins, beads, pearls, flat gems, etc. (if desired)

 Directions:
1.  Lay out the shirt to figure out where you want to put the lace tree.

 
2. Cut the first length of lace.  This will be the base of your tree, so make sure it is the longest piece.


3. Sew the first piece on, slightly angling it like a smile.  Add more pieces of lace, overlapping each piece as you go.  Each length should be slightly shorter than the last.  I used four different types: three laces and one metallic tulle.


4. Add rosettes near the neckline to be the tree topper.  To make the rosettes:  Knot the thread then sew a loose stitch along one edge of the lace.  Pull the thread to make the lace gather into ruffles and sew off the end with a knot when you have enough gathered lace to make your rosette.


 (You could also use a vintage brooch {which I almost did!}, buttons, or cut a star out of felt.)  Also, you could add beads, sequins, etc., to be the ornaments.  I was going to do this, but once the tree was made, I liked the simplicity of it as it was.


 I just can't get over how cute this is! 


Friday, December 2, 2011

Hair Extensions Giveaway!

Run, don't walk!, over to Tatertots and Jello as Jen is hosting an amazing giveaway from Hello Gorgeous Hair Extensions!  These clip-in extensions are made from human hair.  

Check out the site; it's amazing stuff!  :D

Fingers crossed!!

Christmas Tree Crayons

I wanted to make new crayons from the huge amount of broken ones we have!  I have seen so many crayon-makeover tutorials around the blogosphere, but this one is different because (1) they are Christmas trees, (2) I used glitter!, and (3) they are gradient-friendly!  Ha ha!

Supplies:
crayons
silicone ice cube tray
glitter
lots of little people to peel the crayon papers off!
 

Directions:
Preheat the oven to 225 F.  Peel the paper wrappers off the crayons and chop into small pieces.


Assemble similar shades of colours together; pack tightly into a silicone ice cube tray. Add a pinch or two of a similar shade glitter.


Place in the oven for 5 minutes.  Check to see if the crayons are thoroughly melted.   If so, remove carefully and place on counter to cool completely.  If not, leave tray in the oven and check every minute or two until fully melted.  Once cooled, pop out of the tray and enjoy!


I think they are so festive!!  I am going to do a couple trays of these for Christmas gifts and stocking stuffers!

Linking up with some great parties!

Related Posts Plugin for WordPress, Blogger...