Saturday, February 20, 2010

Orange Ambition: Realized

My Very First Sewing Project
by Glamourpuss

I feel like a giddy kindergarten student with the best ever in the whole wide world show-and-tell! Here we go, ladies and gents, presenting my very loooong labour of love:


I wanted to get my daughter a Kaiya Eve pettiskirt, but at $80-95 a pop, that wasn't going to happen right now. So for under $20 I made one! I followed the instructions as per the interview/guest appearance on Martha Stewart found
here, and ending up adding a little more ruffle fluff. I think I ruffled a little too much and ran out of the fluff early, so I am glad I bought a bit extra of the fabric.

I used taffeta instead of satin at the top because it was the only thing (other than cotton) that I could find in the exact shade I wanted. And let's face it, I wanted it super shiny with a fabulously luxe look and feel! After figuring out how to ruffle on my mother's sewing machine (long stitch, tight tension), it went faster than watching a pot of water boil when the stove is on low a lot faster than before!

All in all, I would do it again. Plus, I am excited to do some variations on the basic (can you call something with this many ruffles basic?) skirt and see what I come up with!

Now all I have to do is catch my twirling daughter in it long enough to take her picture!

Friday, February 19, 2010

DIY: Glam Curtains

The curtains in our guest room have no pizazz or sass or excitement at all. They don't reach the floor and that bugs me a lot. So... here is how I transformed vanilla curtains (literally!) into super yummy scrumptiousness!
Step 1:
Sew extra length to the bottom of your curtains. I sewed mine right onto the seam.
See that nasty seam on the left? Yeah, that would be complements of my sewing machine. It needs a swift kick in the needle. I have not been able to fix it at all. I have changed the tension, the needle, the thread, the fabric, and I have rethreaded countless times. All to no avail. Bummer. Anyway, that nice smooth seam on the right is a product of my mother's sewing machine. Thanks, Mom!! (Please don't judge the sewing - it's only my second time, plus my toddler was bouncing around on my lap!!) See my first project here!

Step 2:
Cut off the excess fabric on both sides. I left just over half an inch for the overhang. Note: I didn't cut any fabric off the bottom at this point. I wanted to hang the curtains up to see where the fabric would fall.

Step 3:
I didn't want any visible seams on the sides of the curtains, so what I did instead was use the iron-on adhesive strips. I ironed down the edge first and once it cooled, I inserted the strip between the fold. Then a quick iron and this baby is ready to go!

Step 4:
This one is optional. When I hung the curtains up to check the length, I noticed that the new aubergine fabric was too transparent. Quick fix: I simply doubled the fabric by bringing the extra length up the back of the curtain and sewing the edge onto the same seam as the first. Make sense? Basically, if you look at it sideways, the fabric forms a U with the both top edges of the U getting sewn to the original curtain. Here you can see the original curtain peeking out from between the aubergine fabric.

Step 5:
Get you some pretties!! This sheer ribbon-y fringe has been sitting around forever and a day in my guest room for who-knows-what?! It was one of those "hey, what a great deal! I have nothing to use it for now, but hey, I'm sure I will use it someday!" sort of purchases. I know I must be the only person in the world who does that! {cough} I measured out enough length to add 3 inches of wraparound fringe to each side.

I was going to hand sew it on but the solid-looking part of the fringe is not solid at all. So I got out my fabulous glue gun and went to town on it! My only suggestion is to put the glue on the actual fringe, not the curtain. I switched after about 2 inches. Worked wayyy better!

Step 6:
Feign shortness and ask your wonderful hubby to please hang up the newly fabulous curtains. Never mind the fact that you got them down all by yourself or hung them up again for a quick length-check in the meantime. He wasn't home and doesn't realize this. Praise hubby for his amazing home dec skills!
(This may pay off in you not having to make dinner. It worked for me!)

Step 7:
Last but not least, step back and swoon!

Monday, February 15, 2010

Jello Schmello


The Bake Sale was a huge success! All my cookies were sold out, my cake pops were almost sold out, and the cupid's jello cups were almost all sold out too! The jello cups were the hardest most time intensive of the three. Have you ever tried to pipe chocolate perfectly neatly inside a plastic cup? Took me a few tries, especially since you have to hold the piping bag completely awkwardly to get it inside the cup. Plus I learned the power of gentle rotation when piping. BIG plus on that one!

So I started them around 8 pm, and my sweet hubby went to the store to get more jello for me once I determined that 3 giant jello boxes was not going to cut it. How sweet!!! I ended up using 6 giant boxes of Jello and 2 tubs of Cool Whip.

I finally was finished everything at 2 am, which was perfect since I was watching Singin' in the Rain on TV. Doesn't everyone multitask like this?!? Loooove that movie. Need another old movie fix. Breakfast at Tiffany's? Yes. Me thinks so.


Glam Nursery Part 3

So far we have:
- crib
- bedding
- change table
- curtains
- paint

Still wanted
needed:
- side table
- rocking chair
- wall art
- lighting
- finials
- display space
- lamp


1. Side Table
This is kind of funny because the side table is the most expensive thing in the room. But I already had everything for it (except the ribbon for the lamp) so it was also the least expensive. I will have to do a DIY post on the table, but the Reader's Digest version is this: shop your closet, your kitchen, your guest room and ta-da! Side table done. (Confused? You won't be after I do the DIY post!)

2. Rocking Chair
This was becoming a pain in the bum and neck for me, almost literally. For our son, we had an antique rocking chair that hurt just about everywhere, plus whenever you rocked back, you almost fell off of it. Backwards! Not good. And definitely not happening again. So we tried out rocking chairs everywhere, all the time. I wanted something dainty, not chunky. It couldn't be big because the room is small. I was open to fabric but could not find anything I liked. I considered reupholstering a new chair, but let's face it... the sewing machine was still in its box. One night on the way home, I decided to drive home another way and went past a furniture store that was having a "parking lot sale". And there was my white rocking chair!! Amazing close out deal for about 90% off: a whopping $19!!! Yay! The rest is history.

3. Wall Art
I found some vintage looking artwork of glam evening dresses but they were super small. So I printed a double border twice in black and pink around it to make them fit the frames. Plus, it now looks like it has four or five mattes which is cool.

4. Lighting
We go to Home Depot a lot. My hubby is there several times a week for work-related reasons, and we all tag along sometimes on Saturdays or in the evenings. Plus, the giant car carts are fun - the kids love to steer while I push them around. I usually take the kids to the lighting, outdoor, and plant sections while hubby finds his toys. Long story short: I had drooled over seen the chandelier several times and finally convinced my hubs that we absolutely positively must have it for the baby's room. What is super cool is that since we installed it, I have seen it featured on HGTV and in magazines! I am so glad I started the trend!! lol

5. Finials
After the chandelier was a go, I wanted some other super fab bling in the room. I remember growing up in an old home (built in the early 1900's) that had crystal doorknobs. I found some finials that reminded me of those old doorknobs and it ended up being a match made in heaven! Of course, they didn't fit the curtain rod so my fab hubby put a wooden dowel inside the curtain rod and carved it down so the finial would fit, and now it looks perfectly seamless! Plus I love how they catch the light!

6. Display Space
We had some available wall space above the changing table so I was looking for some shelving that had a crown molding look to it. I kept flipping back and forth between black and ivory, but went with the black at the end. Glad I did! I love black in decor! I think every room needs a shot of it somewhere. I found a great package with the four different sizes of shelves, laid them out on the floor and wonderful hubs installed them while I directed helped. Now I just have to fill the rest of the frames and arranged all the little pretties on them. The tea cup and saucer set was mine when I was little! I did a little DIY on the birds here.

7. Lamp
And now for my biggest annoyance of this nursery. The lamp. I got this lamp when I was a teenager and it was a perfect match for my room at the time. I decided to spray paint it black and had the lamp shade (just added the black satin ribbon to it - hello glue gun!) already in ivory. I was not happy with the effect of the black spray paint; it didn't have enough weight to it. I got the idea to add the ribbon - and 25 yards of ribbon weaving later, I am still not done and it is NOT on the short list of things to finish. Maybe before the summer. The weaving started alright but it is really hard to keep it tight now that the base is getting smaller. The ribbon keeps falling down (which is why I have attached binder clips to keep it up); I tried turning the base upside down, but it doesn't help at all. I am definitely open to suggestions here!!

I also had a feather-trimmed satin pillow on the rocking chair, but that space is now claimed by a giant ivory she-lamb. Guess a girl's gotta rest on the chair when the floor just won't do!

We got the room about 90% done before the baby arrived, and about 98% done before she moved into it from our room.


Oh yes! We added the netting (from my sister's old room) but it was glaringly white. My fix? Stick it in a coffee bath for two days! It didn't dye it brown or anything, but now it's not shocking white. 


For more on the nursery:

Read part 1 here.
Read part 2 here.
Read about the table here.
Read about the mobile here.

Glam Nursery Part 2

I found the changing pad cover first: Super Soft Dot by Carter's in IVORY! Well, actually they called it "ecru". Hallelujah! Finally, something in ivory. There were other options that matched: a dot bumper (reviews showed the length was too short for an average crib), skirting (with only a 12-14" hang - I wanted something to touch the floor), and sheets. You can buy it here.

I also bought 4 crib sheets - 2 in velour and 2 in cotton sateen (they are a bit shiny like satin!) which are amazing!! I wish I had velour sheets! Ha! So the bedding was chosen and the changing pad matched! You can get the velour sheets here and the cotton sheets here.

I got the curtains in a faux natural silk (a bit nubby in texture) and added a 3" black satin ribbon to the bottom. I attached it just above the hem. Here we are part way through the room:

I then added several sizes and colours of ribbon to the bottom of the crib skirting. I kept the same thick black satin ribbon as the curtains and added the others on top. I did sew these ones myself! Hooray for me!!! There is a slight bit of ruffling on the ribbon. The middle ribbon is ivory surrounded by skinny black ribbon and then surrounded by a light pink/ivory striped grosgrain.


We seriously considered painting the crib black. We finally decided not to since I was not going to sand it down to restore the wood if we had another baby. I wasn't sure if I was going to like the plain wood, but it has pinkish tones in it and I actually like having the bit of natural wood in the room.

For the paint, we went to Home Depot and checked out all the light pinks. My favourite brand of paint is Ralph Lauren. It usually has very little smell and goes on like a dream. I found two almost identical shades that I liked. My hubby actually thought they were the same.

We measured out the stripes (about 10" thick) and outlined them all in pencil. Next time I will use chalk instead. They all got striped out in painter's tape. Here's a little tip for painting crisp stripes: after the first colour is on and the second colour is taped out, go over the tape seam with the first colour and let it dry. This provides a barrier to ensure there is no paint seepage from the second colour. You should be left with perfectly crisp straight stripes.

Here is a close up of the stripes. Don't mind the unfinished lamp. It currently has about 25 yards of 7/8" black satin ribbon woven into it. I was expecting to use maybe 15 yards. That was a complete underestimation!

Stay tuned for Part 3!


For more on the nursery:

Read part 1 here.
Read part 3 here.
Read about the table here.
Read about the mobile here.

Glam Nursery Part 1: Inspiration

It's a little late, but here we go! We found out that we were having a girl, so my brain went immediately to princess and bling and ruffles and more bling. I knew I was going to use pink but wasn't feeling inspired with the brown that I found it most often paired with, and I wasn't going to do a bright pink.

I had received these vintage-inspired notecards for Christmas and I just adored them.

So I began to search online for nurseries and bedding ideas that were light pink, black, and ivory. The only problem was there was nothing (at all!) in those colours! I found pink and black. Pink and white. White and black. Ivory all by itself. Not good for me, someone who gets a very particular idea in her head and wants everything to appear perfectly right down to the tiniest detail. OCD much? Not at all!

I decided to get my craft on! I went to the fabric store and found some menswear-inspired ivory cotton sateen fabric, and I bought enough to do the floor-length cribskirt and bumper. It was stretch, but I loved it and my mom sewed it for me. (She gave me a sewing machine last last Christmas, but I have been too intimidated to even take it out of the box. Pathetic, I know.)

I found a change table I sort-of liked, so I designed a similar but completely different one that my hubby built out of MDF. I needed shelving in it for storing the baskets I bought since we were not going to put a dresser of any sort in the room while the change table was in there.

My goal was to get the whole room done before baby arrived...


For more on the nursery:
Read part 2 here.
Read part 3 here.
Read about the table here.
Read about the mobile here.

Sunday, February 14, 2010

Yay! I Was Featured!!

The DIY Show Off

Check out the post about my daughter's nursery at The DIY Showoff! Thanks, Roeshel!

Saturday, February 13, 2010

Decor Luv

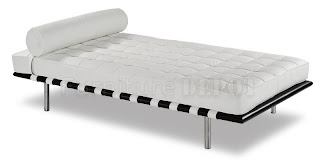
These are a few of my favourite things right now: Philippe Starck Louis Ghost Chair (and Lou Lou Ghost Chair for the kiddos) These have been around for close to a decade and are still at the top of my list! Found here and the children's version found here. I can't decide where I would put these... home office, dining room, living room... SOOO many options! Fendi Styling Chair If I was a hairstylist, I would (a la Rachel Zoe) die for this chair! Soooo amazing, it looks like you're sitting in a giant multi-faceted onyx. J'adore! Found here. White Leather Tufted Couch Deep tufting, white leather, pleating - what more could you ask for? This one is maybe a little too traditional for me, but I like it regardless. I don't discriminate! Found here. Version #2: I like this couch (sofa? which is accurate? oh well, as long as we don't say chesterfield, which is what my mother would say.) I would add some feather-stuffed pillows and a wonderfully tactile throw, maybe in cashmere or faux fur. Found here. Version #3: This one would be perfect for our theatre room once there are actually walls in it! Haha Note to self: need to find a classic style full size popcorn cart. Found here. Mies Van Der Rohe-esque Chaise with Bolster I have this in black - it was one of those purchases that I wasn't sure about at the time, but now it is one of my favourite things. Found here. Sunburst Mirror without the gilt I wasn't a fan of the 60's style sunburst mirror (for some reason, it reminded me of a bronze base coffee table my parents had that was a pain and a half to clean) that has been all over every decor magazine for the past few seasons, but the cleaner lines of this one are perfect!
Found
here.
Capiz Shell Chandelier Wouldn't this be so amazing over a tub? Swoon! Found here. Chandelier Option #2: Hello, future dining room chandelier. I love you. Lots.
Found
here. Chandelier Option #3: Super gorgeous. Cannot decide whether I like #2 or #3 better.
Found
here.

It's A Couch Morning

My plans for Saturdays are always ambitious. I would typically make a list such as: get all the laundry done, folded, ironed, and put away. Vacuum whole house. Wash all hard floors. All baseboards washed. Complete all paint touch ups. Aaaaand then in the afternoon, we can have time to watch a movie... Yeah right.

Not so much today. After a MARATHON Monopoly game last night, I am exhausted. All that is on my mind is letting the kids watch Penguins of Madagascar while I get my Google Reader back down to zero. Plus those little scheming penguins are pretty funny!

Is it time for a nap yet?

Friday, February 12, 2010

What to Do When...

What to do when you have no available laundry baskets, the dryer is drying, and you need to get another load in the wash:


A dump truck would also likely work.

Wednesday, February 10, 2010

Orange Ambition


Hopefully this fabric will soon be a pettiskirt as seen here. This should be interesting, particularly since I don't know how to sew. Finally figured out how to thread my bobbin, thanks to youtube and the super junky instruction manual. Is it just me, or do you judge companies by their manuals? This company gets two thumbs and eight fingers down from me. The manual is sooo hard to follow simply because I can't interpret their version of the English language.

So far I have sewn a few of the largest strips together, but my machine went wonky and just about earned itself a boot out the window. Since I was feeling generous, I decided to give it another chance. Not that it has earned it. AT ALL.

However, I feel like I should name my sewing machine. Maybe I would like it more then. Hmm, maybe then it would work for me. Kinda doubtful on this one. The working for me part, not the naming part.

Tuesday, February 9, 2010

Icing Icing Everywhere

My son's kindergarten class is hosting a bake sale this Friday and all the parents were asked to bring something Valentine-ish to sell. I am making cake pops (2 kinds if I have time) and these cute jello cups from here.

I also made sugar cookies so I could test out my new heart cookie cutters. I am soooo glad I made them because at 10 pm tonight I remembered that I am supposed to bring Valentine treats for their class party tomorrow!


I did something new this time. Instead of using flour to roll out the dough, I used powdered sugar. So awesome!! Taste is definitely different!

So I made some hot pink icing for me to eat by the finger-full for the cookies and thought I would flood a few of them. Here are two of them made into a cookie sandwich.


Step 1: Place a rack on a plate (to catch the drips), and put your cookie on the rack.


Step 2: Pour the icing over the cookies. I used a small measuring cup. Check all the way around the cookies so you find any missed spots.


Step 3: Carefully move the cookies to a clean rack to dry. Now is the time to put your sprinkles on! I used red and pink sprinkles on these sandwich cookies.

And then I iced and iced and iced some more. Nothing super fancy, just enough for a bunch of kids to inhale eat in 30 seconds flat!


So now they dry all night long. And I sleep. Hello lovely bed!

Saturday, February 6, 2010

Can-Can Skirt

Enter to win a super cute can-can skirt over at Brown Paper Packages here. Hurry! Contest ends Feb 10th! I already entered!

Old Fashioned Tapioca

I used to make this all the time before I got married. It was a favourite of my parents and my grandparents. My brother and sister were not too interested in the texture, but I loved it. I think you either love tapioca or you hate it. My hubby and son are not huge fans, so whenever I make it, my daughter and I pig out on it go to town with it!

I had fish-eye tapioca at school once. Is that what it's called? It looked like fish eyes and tasted like arrowroot cookies. I didn't mind that one but I wasn't going back for seconds, that's for sure.

This recipes uses instant tapioca. I got this recipe from an old cookbook of my mother's but I don't remember which one. I have made the recipe from the back of the tapioca box, but it gets two thumbs down from me.

Here it is!

Tapioca Pudding
(makes 4 servings)

1 1/2 cups milk
1/8 tsp salt
1/4 cup sugar
3 TBSP instant tapioca
2 eggs, separated
1/2 tsp vanilla or almond flavouring

1. In thick-bottomed pot, heat milk; add salt, 1/2 the sugar, and tapioca. Stir occasionally. Cook 20 minutes or until thick. (Usually is about 20 minutes bang on.)
2. Beat egg whites until stiff, then add remaining sugar. Beat until sugar is incorporated.
3. Beat egg yolks until light in colour. Add some tapioca, mix together, and return to pudding. Be sure to blend completely. Add flavouring. Cook 3 minutes until thick.
4. Remove from heat; fold in meringue. Tapioca should be light and fluffy.

Can top with fresh fruit or homemade jam.


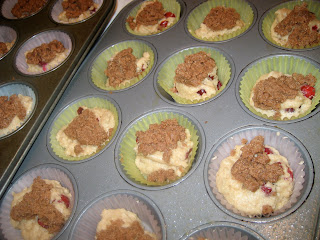
Valentine Muffins: Cranberry with Streusel

Adapted from Colleen's recipe at allrecipes:
Original recipe shown (my changes in parentheses).

INGREDIENTS:

Muffins:
1 1/2 cups all-purpose flour (I used 1 cup of whole wheat flour and 1/2 cup of all-purpose flour)
3/4 cup white sugar
1/2 teaspoon salt
2 teaspoons baking powder
1/3 cup vegetable oil (I used grapeseed oil)
1 egg
1/3 cup milk
1 cup fresh blueberries (I used 1 cup frozen cranberries, plus 1/3 cup dried sweetened cranberries)

Streusel:
1/2 cup white sugar
1/3 cup all-purpose flour
1/4 cup soft butter
1 1/2 teaspoons ground cinnamon

DIRECTIONS:

1. Preheat oven to 400 degrees F (200 degress C). Grease muffin pan or use muffin liners.
2. Combine all dry muffin ingredients.
3. Place oil in 1-cup measuring cup; add egg. Add enough milk to fill up to the 1-cup mark. Mix this with the dry mixture. Fold in cranberries.


4. For streusel: Mix all ingredients.


5. Fill muffin cups and top with streusel mixture.


6. Bake 20-25 minutes or until done. (Mine were done in 15 minutes.)

NOTE: This recipe originally yields 8 large deli-style muffins. I was able to make 24 muffins (16 regular and 8 child-size). The frozen cranberries added a wonderful pop of tartness, while the dried cranberries added some sweetness. I have made this recipe several times - sometimes following the ingredient list, and sometimes not. Chocolate works well too!


Wednesday, February 3, 2010

Luxe Salads at Home

#1. Get a pretty plate. I used a large glass one that isn't necessarily pretty-pretty, but it definitely lets the salad shine!

#2. Use mixed baby greens. Already your salad is looking good!!

#3. Add toppings with different shapes, colours, and textures. I used some feta cheese, dried cranberries, sunflower seeds, and some sections of an orange. Arrange in a pretty way!

#4. Pour on a vinaigrette in a zigzag pattern, letting some drops fall around the perimeter of the plate. Mine was fig balsamic. Yummmm!!
 
Lovely. Now where's my fork?


Aaand we're done.

Spray Paint = Wonderful

I have read so many blogs that talk about the wonders of spray paint, how it can turn the most mundane of things into super fabulous, and why it is the best thing next to sliced bread. So here is my mini spray paint makeover.

Hello there, little birdies! Get ready for your shower!
Oops! We've got a black eye! Better get 'em both done, darlin'!

And here are our made-over birds, sitting on the shelves in my daughter's room. (Don't mind the shelf content - it's not done yet!)


And there you have it! Happy spray painting!


Related Posts Plugin for WordPress, Blogger...