Showing posts with label parties. Show all posts

Saturday, May 19, 2012

A Party For Me, By Me

Yesterday I worked on so many things around the house... laundry, laundry room decor, master bedroom / bathroom decor, decluttering, organizing, and such and so on.  Then I got stung by a bee.  So not fun!  

So I decided today was going to be a better day.  So what's a girl to do?  Well, throw herself a party of course!  My daughter and I have sampled pretty much everything already, so we are {patiently} waiting for hubby and son to get home so they can get in on the sampling goodness.


On the Menu:

Meringue Stars and Roses


Vanilla Creme Patissiere Shots with Sweet Cream Caramel


Cream Puffs and Eclairs with Pastry Cream and Dulce de Leche


Rhubarb Cream Merigue Gateau


I think this whole throwing-yourself-a-party thing is fabulous!  Can't wait to eat do it again!

Monday, July 18, 2011

Birthday Party: Jedi Training Academy: The Invite

All great parties start with the invitation.  Being barely associated with Star Wars and all the things that go along with it, I searched online and found several ideas for invitation wording.  I wanted the invitation to be just like the rolling paragraphs at the beginning of the first movie.  (First movie meaning first made, not Episode I.  That still confuses me!)

So I merged several ideas together, rewrote most of it, and came up with this invite:

 
The invitation was placed in a large brown envelope with this label:
 
 
Children who responded were given a second directive:

The invitations were a huge hit and promised of wonderful things to come!


Thursday, May 19, 2011

Birthday Party Preview


Here is a preview of one of my parties!  I am hoping to get the whole post up soon.

I posted about the cake here.

Stay tuned!  :)

Monday, February 28, 2011

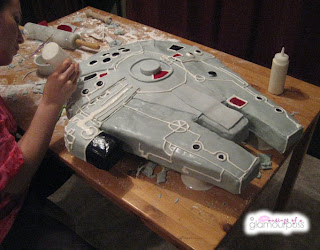
Millenium Falcon Cake

I think I had heard of Star Wars once or twice before I met my husband.  Now I am quite well acquainted with it, in my opinion. Haha!  I have only been forced to managed to watch Episode 4 though.  Or whatever number was the first one ever made.  My hubby has passed on his Star Wars love to our son, who decided that it would be a great (ie. super galactically fabulous!) theme for his birthday party.  So here is how I made his cake...

Step one:
Trace your outline onto plywood or other base.


Step two:
Cover the entire thing in tinfoil.  We don't want any slivers in the cake!!  I put a ruler on top just so you can see the size of this thing!


Step three:
Bake cakes, and cakes, and more cakes.  This took FIVE cake mixes to cover!!  Then whip up some buttercream (I made three batches of cream cheese buttercream tinted grey) and start covering the cake.  Make sure you build it up in the middle.


Step four:
Make your fondant and start covering everything.  You may want to cut out some additional pieces for some areas to give more of a 3D look.


Step five:
Now for the time-consuming stuff!  Everything up to this point is the quick stuff.  Yeah, right!  No, seriously!!  Start decorating!  I used red, blue, and black gel colours to paint some areas of the cake.  Let the gel dry a bit before piping your icing.  I made a royal icing recipe to ensure everything hardened up and stayed beautiful!  So pipe, pipe, and pipe some more!  When you are done piping, go back and pipe more.  Trust me.

Also, it helps if the cake is sitting up off your table.  Notice mine is sitting on top of bowls flipped upside down.  Having it up in the air helps you decorate all the way to the bottom.


Step six:
Let it dry overnight.  This will be helpful especially for the gel colours.


Step seven:
Now deliver to party site and admire!  We had to lay ours flat for delivery and I ended up not raising it back up off the table.  But no one minded that at all!  Here are some close ups!


PS  If you are wondering how long this took, I started in the afternoon and had some breaks.  Plus baking time (I only baked one cake at a time and had to bake five).  I finished up somewhere around midnight.  Yes, I really love my kids! :)


Linking up with some great parties!

Friday, February 25, 2011

Crazy Pink & Green Cake

Last year, I made a cake for my friend's birthday.  She is a super fun girl, so we had to have a super fun cake.  I was thinking of those cakes that are all off-kilter, and wanted to try my hand at that.


Crazy layered cake - lime and vanilla flavoured layers with cream cheese frosting and raspberry flavoured fondant.  Add in some coloured sugar, feathers, and pinky pearl luster dust, and this is what we get:


Wednesday, October 20, 2010

DIY: What's Old Is New Again: Crepe Paper Party Decor

I am pretty sure that the last time I had crepe paper at a party was when I was about 3. I have never really used it for anything but my friend begged me on her hands and knees asked me to help her do a 65th birthday party for her mother. On zero budget.

So out came the crepe paper from the dollar store and here is what I came up with. I am calling it my "Crepe Paper Installation" since that sounds so artsy and fun!! Ha!

Here is a close up. All you have to do is cut matching lengths of crepe paper and tape them side-by-side. The wood is actually doors to a white board behind it - the crepe paper on the left door is all twisted one way, and the paper on the right is twisted opposite. I love how it turned out!


I am linking up with these parties!

Monday, August 16, 2010

Fast & Easy DIY: Blinged Napkins

Supplies:
Napkins (or serviettes as my mother says)

Mini sticky gems


Directions:

1. Determine number of gems per napkin. I did three on mine.


2. Stick gems on napkin.


3. Repeat.


So cute!


Sunday, August 15, 2010

DIY: Glam Card Box

Supplies: 1 large card box (available at party/craft stores)
mini sticky gems (available at dollar stores or craft stores)
ribbon
lighter or lit candle
glue gun

Instructions:

1. Assemble card box according to instructions. Alternately, use your own box (just cover in wrapping paper and cut a large slit in the top).

2. Determine ribbon location. I wrapped my ribbon around the box and cut with an extra inch in length. I then heat-sealed the edges (with a lighter) and began on a side edge, adding a tiny bit on glue on each box corner. Repeat for each length of ribbon. I added bows to each ribbon stripe by making a loop and gluing together. (Sorry, forgot pics of this!) You should be left with a ribbon that looks like the number 8 when looking at it sideways. Then cut a short piece to wrap around the centre of the "8", and glue to ribbon stripes.


3. For the top, lay your ribbon out and cut exact length needed. Seal your ribbon edges, and glue ribbon around box opening. I added bows here too.


4. Affix the sticky gems to box. I used up one colour of sticky gems before I moved onto the next colour to ensure each side of the box got an equal amount. I also added some to the centres of the bows.

5. Admire and sighhhh at your chic box!


Related Posts Plugin for WordPress, Blogger...