Showing posts with label Star Wars. Show all posts

Wednesday, January 11, 2012

DIY Soft Light Sabers

For my son's Star Wars-themed birthday, we set up several different types of games, all with Star Wars flavour!  One of the games was a light saber duel, and we needed something that could be used without harming any of the kids.  We also still needed some kind of party favour.  Enter the soft light saber, a toy that is still getting lots of use in our house a year and half later!

Supplies:
foam pool noodle
electrical tape in 1-2 colours
duct tape in black

magic marker


Directions:

1. Cut the pool noodle in half.

2. Wrap one end of the pool noodle with three strips of duct tape, creating the light saber handle.  Wrap each end of the duct tape in coloured electrical tape.

3. Use the magic marker (we used fat Sharpies) to darken the cut end.

4. Have fun!


Linking up with some great  parties!

Monday, July 18, 2011

Birthday Party: Jedi Training Academy: The Invite

All great parties start with the invitation.  Being barely associated with Star Wars and all the things that go along with it, I searched online and found several ideas for invitation wording.  I wanted the invitation to be just like the rolling paragraphs at the beginning of the first movie.  (First movie meaning first made, not Episode I.  That still confuses me!)

So I merged several ideas together, rewrote most of it, and came up with this invite:

 
The invitation was placed in a large brown envelope with this label:
 
 
Children who responded were given a second directive:

The invitations were a huge hit and promised of wonderful things to come!


Thursday, May 19, 2011

Birthday Party Preview


Here is a preview of one of my parties!  I am hoping to get the whole post up soon.

I posted about the cake here.

Stay tuned!  :)

Wednesday, March 16, 2011

Thanks and Welcome!

Wow!  I never knew so many people liked loved Star Wars!  Haha!  The cake I made has received lots of features, so I made a new page to say thanks to all who featured me!  Go visit as many links as you like!

Also, I wanted to say hello and welcome to all my new followers!  I have had this blog for over a year, but never really got into it until a few weeks ago.  I am always so excited when I log in and find a new follower has linked up!  So, welcome one and all! 

I can't wait to show you all some of things I am working on!!  :)

Monday, February 28, 2011

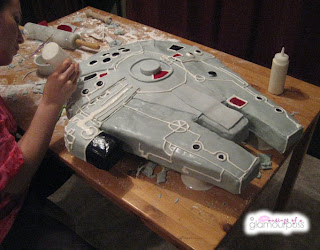
Millenium Falcon Cake

I think I had heard of Star Wars once or twice before I met my husband.  Now I am quite well acquainted with it, in my opinion. Haha!  I have only been forced to managed to watch Episode 4 though.  Or whatever number was the first one ever made.  My hubby has passed on his Star Wars love to our son, who decided that it would be a great (ie. super galactically fabulous!) theme for his birthday party.  So here is how I made his cake...

Step one:
Trace your outline onto plywood or other base.


Step two:
Cover the entire thing in tinfoil.  We don't want any slivers in the cake!!  I put a ruler on top just so you can see the size of this thing!


Step three:
Bake cakes, and cakes, and more cakes.  This took FIVE cake mixes to cover!!  Then whip up some buttercream (I made three batches of cream cheese buttercream tinted grey) and start covering the cake.  Make sure you build it up in the middle.


Step four:
Make your fondant and start covering everything.  You may want to cut out some additional pieces for some areas to give more of a 3D look.


Step five:
Now for the time-consuming stuff!  Everything up to this point is the quick stuff.  Yeah, right!  No, seriously!!  Start decorating!  I used red, blue, and black gel colours to paint some areas of the cake.  Let the gel dry a bit before piping your icing.  I made a royal icing recipe to ensure everything hardened up and stayed beautiful!  So pipe, pipe, and pipe some more!  When you are done piping, go back and pipe more.  Trust me.

Also, it helps if the cake is sitting up off your table.  Notice mine is sitting on top of bowls flipped upside down.  Having it up in the air helps you decorate all the way to the bottom.


Step six:
Let it dry overnight.  This will be helpful especially for the gel colours.


Step seven:
Now deliver to party site and admire!  We had to lay ours flat for delivery and I ended up not raising it back up off the table.  But no one minded that at all!  Here are some close ups!


PS  If you are wondering how long this took, I started in the afternoon and had some breaks.  Plus baking time (I only baked one cake at a time and had to bake five).  I finished up somewhere around midnight.  Yes, I really love my kids! :)


Linking up with some great parties!

Related Posts Plugin for WordPress, Blogger...