Showing posts with label cakes. Show all posts

Sunday, May 13, 2012

Petal Cake

I love Mother's Day!  Partially because I get presents, partially because my hubby preps all the food all day and changes every single diaper all day (which doesn't matter now, but a few years ago it sure did!), plus I can take a 3 hour bath if I feel so inclined.  Haha!  Really though, I always feel very cherished and appreciated on Mother's Day by my hubby and children, and that is the best gift of all.  I hope I make my mother feel the same way.


My hubby announced that this year we would be going over to my parents' home in the afternoon, and he and my brother would be taking care of the meal.  I offered to make dessert since I have been lusting after all the fabulous cakes I have been seeing (and pinning!) on Pinterest.  

{Check out my food Pinterest board here.}

I had a plain fondant cake in mind with a lovely ruffly flower perched on the very top.  The sides were going to be super smooth and crisp looking with a ribbon tied around the base.  Of course, I decided to try a new fondant recipe.  Usually I make the traditional, over-the-stove with tons of crazy sounding ingredients fondant which tastes okay but not spectacular.  I decided to try marshmallow fondant instead.  It was great up until it came out of the fridge.  The fondant got an attitude and started cracking like nobody's business.  I had already created 14 ruffled flowers for the top "flower mound" that I was envisioning.  So the rest of the scrap fondant became ruffled petals that I stuck all over the sides of the cake.  I thought it looked pretty decent although still too plain.


Then out came my wonderful gold luster spray!  A hit of spray in the middle of each petal, plus a general misting all over, and voila!  I think it looks great!  I can't wait to taste it!  It has 4 alternating layers of french vanilla and lemon cake.  I filled it with lemon curd and vanilla buttercream.  Yummy!

Special thanks to my hubby who rearranged the fridge to fit the cake inside!  Love you baby!!  :)

Happy Mother's Day!


Tuesday, March 22, 2011

Cake & Contest

 My Millenium Falcon cake has received so many great comments and reviews that I decided to enter it in a fun contest hosted by Pure Joy Events!  It is a Party Tutorial Contest and any DIY tutorial for anything party-related (like invites, cupcakes toppers, etc.) is eligible.  So I have linked up my cake!

Pure Joy Events Party Tutorial Contest 

The contest is open til March 31st!  You can enter here.  Good luck!   :)

Wednesday, March 16, 2011

Thanks and Welcome!

Wow!  I never knew so many people liked loved Star Wars!  Haha!  The cake I made has received lots of features, so I made a new page to say thanks to all who featured me!  Go visit as many links as you like!

Also, I wanted to say hello and welcome to all my new followers!  I have had this blog for over a year, but never really got into it until a few weeks ago.  I am always so excited when I log in and find a new follower has linked up!  So, welcome one and all! 

I can't wait to show you all some of things I am working on!!  :)

Monday, February 28, 2011

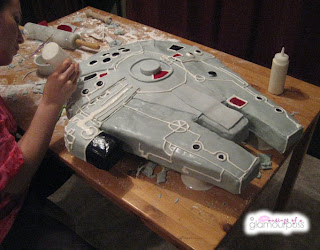
Millenium Falcon Cake

I think I had heard of Star Wars once or twice before I met my husband.  Now I am quite well acquainted with it, in my opinion. Haha!  I have only been forced to managed to watch Episode 4 though.  Or whatever number was the first one ever made.  My hubby has passed on his Star Wars love to our son, who decided that it would be a great (ie. super galactically fabulous!) theme for his birthday party.  So here is how I made his cake...

Step one:
Trace your outline onto plywood or other base.


Step two:
Cover the entire thing in tinfoil.  We don't want any slivers in the cake!!  I put a ruler on top just so you can see the size of this thing!


Step three:
Bake cakes, and cakes, and more cakes.  This took FIVE cake mixes to cover!!  Then whip up some buttercream (I made three batches of cream cheese buttercream tinted grey) and start covering the cake.  Make sure you build it up in the middle.


Step four:
Make your fondant and start covering everything.  You may want to cut out some additional pieces for some areas to give more of a 3D look.


Step five:
Now for the time-consuming stuff!  Everything up to this point is the quick stuff.  Yeah, right!  No, seriously!!  Start decorating!  I used red, blue, and black gel colours to paint some areas of the cake.  Let the gel dry a bit before piping your icing.  I made a royal icing recipe to ensure everything hardened up and stayed beautiful!  So pipe, pipe, and pipe some more!  When you are done piping, go back and pipe more.  Trust me.

Also, it helps if the cake is sitting up off your table.  Notice mine is sitting on top of bowls flipped upside down.  Having it up in the air helps you decorate all the way to the bottom.


Step six:
Let it dry overnight.  This will be helpful especially for the gel colours.


Step seven:
Now deliver to party site and admire!  We had to lay ours flat for delivery and I ended up not raising it back up off the table.  But no one minded that at all!  Here are some close ups!


PS  If you are wondering how long this took, I started in the afternoon and had some breaks.  Plus baking time (I only baked one cake at a time and had to bake five).  I finished up somewhere around midnight.  Yes, I really love my kids! :)


Linking up with some great parties!

Friday, February 25, 2011

Crazy Pink & Green Cake

Last year, I made a cake for my friend's birthday.  She is a super fun girl, so we had to have a super fun cake.  I was thinking of those cakes that are all off-kilter, and wanted to try my hand at that.


Crazy layered cake - lime and vanilla flavoured layers with cream cheese frosting and raspberry flavoured fondant.  Add in some coloured sugar, feathers, and pinky pearl luster dust, and this is what we get:


Thursday, August 12, 2010

Williams-Sonoma "The Great Cupcake Pan"

My parents gave me this cute giant cupcake pan for my birthday. My kids wanted to go home immediately and bake! Typical. (Mommy was pushing for that, too!) I usually don't make cakes from scratch since they are generally heavy or dense. My hubby really likes the cake mix cakes because they are light and fluffy, so very few from-scratch cakes happen at our house. The cupcake pan comes with a recipe that is super. Fabulous. Awesome. Amazingness. Not heavy. But not airy light. Just somewhere in the middle of perfection! I'm not going to type it out - way toooo long!! I'd be typing til next Tuesday...


I followed the recipe exactly (hey, there's a first time for everything, right?!) and it turned out wonderfully. The giant cupcake dropped out of the pan perfectly. No pieces to mend, no missing spots, just gorgeousness in a cake. Can you tell it was a wonderful experience? Ha ha!

The only thing I would try differently next time is in the assembly of the cupcake. The directions tell you to place the top of the cupcake back into the pan, level it by cutting with a serrated knife, and cover the cut side of the cupcake with buttercream. Then you are supposed to flip the base over and lay the cut side down onto the buttercream. This means buttercream is sandwiched by both leveled sides of the cupcakes. This worked alright, but after chilling, it did not drop out of the pan until it warmed up a little bit. So next time, I may just assemble it on a cake plate, right side up of course.


We are now waiting impatiently for hubby to get home so we can demolish sample it.

Tuesday, August 10, 2010

Music Note Cake Pops

My son's school had a music night a while back and I volunteered to bring something for the food portion of the evening. Of course, I can't do something that someone else may bring. I have to be unique - maybe this is the Type A in me?

Anyway, so I made cake pops (thanks to
Bakerella for inspiration!) but not in the conventional way. I baked a vanilla cake mix that I tinted Tiffany blue (I was testing the colour for another cake - more on that one later...) and then smashed it all up. Add in some cream cheese frosting and we're ready to go.

I rolled the mix into small balls and inserted a stick into each one. After dipping each one in melted chocolate, I set them upside down on parchment paper with the stick up in the air. Some sprinkles and such were added, and then I piped some royal icing around each stick for extra stability.


The next morning, I flipped the cake pops over and stuck them in my styrofoam board. I piped a dark chocolate ganache circle onto the base (now the top) of each cake pop. While the ganache was still setting, I gently laid the music notes on top. (It is possible that I broke almost as many music notes as I used. No telling though. Those are super duper fragile little things!!)

Needless to say, they ended up being used at the fundraiser table instead of the food table, and not one was left. I didn't even get one. :( Oh well, maybe next time.


Sunday, March 21, 2010

Fabulous Cakes!


I have been super busy the last several days and I wanted to show you some of what I have been up to!

One thing you may know about me is that I love to bake. What you may not know is that I like to make cakes with rolled fondant icing!

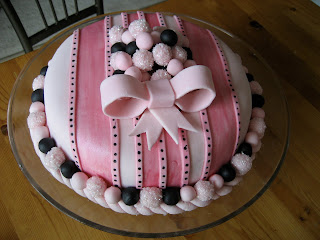
I made this one for my daughter's first birthday. It actually matches her room - white, black, and pink! I didn't plan it - just worked out that way! It was a french vanilla cake with cream cheese frosting inside and almond-flavoured fondant. I used pink and black gel food colouring. The black dots on the thin light pink strips was done by sticking a toothpick in the gel and then poking the toothpick into the fondant. I also used an edible shimmer dust mixed with water that I painted on the fondant (those are the darker pink stripes). I absolutely HAD to put a bow on top, partially because bows = little girls, but also because I make hair bows! Couldn't let all the guests down who were expecting a bow cake...


I asked my son what he wanted for his birthday. First he wanted a four-tier blue cake with candy pieces on it. Then he changed his mind and went for penguins. A big shout out to my hubs who made the cute lil penguin critters. I added the 'snowballs' around the outside and powdered sugar for a snowy landscape! He loved his cake! Flavourings were the same as the pink cake above.

Close up of a penguin baby sliding down the 'ice'. Isn't he just the cutest?

And the newest cake to add to my repertoire... One of my longtime friends had her birthday party last week and I volunteered to bake the cake! I told her I was going for a bit of an eighties vibe. It's kind of hard to see the bottom layer, but it was tie dye! I added crazy bits and pieces all over it to represent confetti and streamers and balloons. Lime green stripes was next, with polka dots following on the next layer. The top layer had a giant daisy outline on it. And yes, it is supposed to be lopsided. Ha! Wondering what is coming out of the top? Yes! Feathers!!


She loved it and the cake was almost completely demolished that night! Not many leftovers at all! This time, the cake was vanilla and lime layers with cream cheese frosting. The fondant was flavoured raspberry! Yum yum!!


So whose birthday is next?!? ;)

Related Posts Plugin for WordPress, Blogger...