Showing posts with label fabric. Show all posts

Tuesday, February 22, 2011

Handmade {Valentine} Cards II

In case you missed the first post, you can read it here.

Supply list according to card:
1. hand ripped construction paper, ribbon, beads, wire, large safety pin (this one was for an adult; no pins for kids!)
2. ruffled lace with thread, ribbon, foam hearts
3. red tulle, ribbon, foam hearts, pen
4. hand ripped construction paper, ribbon, foam hearts, pen
5. foam hearts
6. hand ripped construction paper, kitchen twine, foam hearts
7. ribbon (I wove it picnic basket style), foam hearts
8. pink striped clear packing tape, hand ripped construction paper, ribbon, foam hearts
9. pink tulle, pink striped clear packing tape, hand ripped construction paper, ribbon, sequin/bead trim
10. red tulle, ribbon, kitchen twine
11. silk flowers
12. lace, ribbon


Sunday, February 20, 2011

Handmade {Valentine} Cards I

Well, I made these in time for Valentine's Day but didn't get them posted.  Oh well, I am just super duper early for V Day 2012!

I cut cardstock paper into 4 pieces and used a hot glue gun to attach everything.  This is where the box of vintage buttons and zippers that I got from my grandma came in handy.  I bought nothing - everything was already in my house.  We wrote on the backs and taped a chocolate heart on the back of each one.  I did spend $1 or so on chocolate hearts.  

My kids had a great time handing these out!


Supply List according to card:

Card 1: hand ripped construction paper, vintage zipper
Card 2: organza, thread
Card 3: hand ripped construction paper, ribbon, foam heart
Card 4: ribbon
Card 5: ribbon, vintage buttons, foam hearts
Card 6: red tulle, hand ripped construction paper, vintage zipper
Card 7: red tulle, ribbon, linen, vintage button, glitter
Card 8: kitchen twine
Card 9: red tulle, hand ripped construction paper, ribbon, foam hearts 
Card 10: pink tulle, ribbon, vintage buttons


I have more cards to post, so stay tuned!

Linking up with some great parties!

Tuesday, February 1, 2011

DIY Custom Crib Mobile

What You Need:

1. Skinny ribbon to match room colours, precut into 18" - 24" lengths
2. Small trinkets: beads, pearls, vintage buttons, keys, fuzzy pom-poms, etc.
3. Darning needle
4. Netting canopy

Directions:

1. Thread the needle with the ribbon.  Tie one end of ribbon into a knot.  This will hold your trinket in place.
2. Thread through your trinket.  Push it down to the knotted end of the ribbon.  I used two colours of pearls for mine.
3. Thread through netting, remove the needle and tie ribbon in a knot to secure the ribbon onto the netting.  I finished off my ends by making a bow.
4. Repeat as many times as you like!


I found it helps to take the netting down from the ceiling and work with it on the floor.  No sore arms that way!


For more about the nursery:
Read part 1 here.
Read part 2 here.
Read part 3 here.
Read about the table here.

Linking up with some great parties!

Monday, December 20, 2010

One Garland, Five Ways

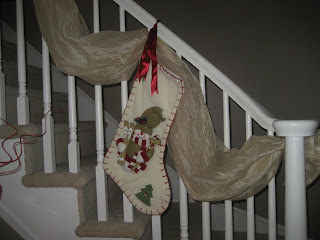
I have used a swath of fabric instead of a traditional garland for three Christmases now, and I love it so much that it stays up year round (minus the decorations)!

All Season Style
Here she is, in all her wonderful splendor! The fabric is a dark ivory crushed sheer satin, and I originally used it as a super long curtain swag. I used little bits of ribbon to tie it to the staircase.

Vintage Christmas Style
This wreath is a dark ivory bottlebrush-style base with small penny-sized red bulbs. Add a ribbon for a touch of flair and to match your Christmas style. Gingham is perfectly vintage-y!

Classic Christmas Style
Nothing says classic Christmas like snowmen and stockings with giant stitching! This is my son's stocking and it looks super cute hanging with the fabric. Some dark red satin ribbon ties it up on the staircase. So festive!

Transitional Christmas Style
I bought these 3D stars several years ago at Pier 1 Imports. These stars get used in a different way every Christmas - this year, I have a gold star as a tree topper! I love that they can be used so many ways and match so many styles. Use a bit of ribbon to tie them to the staircase and add some punchy ribbon behind to match your colour palette.

Contemporary Christmas Style
I absolutely adore these fluffy feather balls! I bought them last Christmas and they have been living in a large vase ever since. I had just enough to go on each swag! I love it!! This one may be getting a repeat performance next year!

Monday, October 11, 2010

Nemo/Panda/Polar Bear Orange Bedroom

Nemo and pandas generally don't go together. Never mind about polar bears added to the mix as well! But my friend's 9 year old daughter loves them all equally so I was determined to pull the 3 all together into a gorgeous bedroom.

This bedroom was much harder to initially begin than the other one. We started with an underwater idea (because of Nemo). Then that idea was tossed out to sea (knee-slapping jokester here, I know!) and we turned to a wildlife/jungle/bamboo idea. Again, no go.

As I was trying to get these animals together in my head, I thought that we should perhaps take a different approach. Bright creamsicle orange for the room with black and white accents everywhere, and somehow the 3 creatures will fit in. I hope. All together. Errgggghh.

Luckily, her daughter went for the idea and is madly in love with orange. Her last bedroom was orange as well.

Here is the paint:
And here you can see an inspiration pillow that will give you a clue as to the remainder of the room:


More reveal coming!

Friday, October 8, 2010

Purple Princess Bedroom

As I have mentioned previously, I am helping a friend decorate her new home. She has two lovely daughters, ages 7 and 9, and first up on the decorating list was their rooms. These two girls are super different in their tastes, so we knew that there would be no (a) paint color sharing, (b) style sharing, or (c) fabric sharing.

The younger girl wanted a princess feel and her mom wanted it to last several years (i.e. "big-girl-princess-turning-tween-princess"). So we didn't go crazy with Belle, Ariel, Cinderella, Jasmine, Snow White, and Aurora (all nice girls, I'm sure!). First thing was to choose a fabric for the curtains. Originally, the 7 year old wanted pink since her previous room had a purple satin "Southern Charm with ruffles" feel. However, we found a gorgeous, light embroidered white cotton with purple, teal, lime, and dolphin grey flowers. Super gorgeous! But no pink to be found. And she loved it! So pink was out and purple was in!

Another thing to consider: we were trying to keep this room makeover as budget-friendly as possible. That meant the purple satin bedding was staying as well as the hand-me-down (but in wonderful shape) bedroom suite in dark cherry wood.

We decided to go with a grey-lavender wall color. The crisp white embroidered fabric was sewn into curtains (way to go, ME!) and a duplicate set of purple satin sheets was also sewn into curtains (once again, way to go, ME!) - one white and one purple per window side.


The curtains don't have enough tabs at the top yet, but at least you get the idea...

Stay tuned for more!!

Related Posts Plugin for WordPress, Blogger...