Showing posts with label baking. Show all posts

Saturday, May 19, 2012

A Party For Me, By Me

Yesterday I worked on so many things around the house... laundry, laundry room decor, master bedroom / bathroom decor, decluttering, organizing, and such and so on.  Then I got stung by a bee.  So not fun!  

So I decided today was going to be a better day.  So what's a girl to do?  Well, throw herself a party of course!  My daughter and I have sampled pretty much everything already, so we are {patiently} waiting for hubby and son to get home so they can get in on the sampling goodness.


On the Menu:

Meringue Stars and Roses


Vanilla Creme Patissiere Shots with Sweet Cream Caramel


Cream Puffs and Eclairs with Pastry Cream and Dulce de Leche


Rhubarb Cream Merigue Gateau


I think this whole throwing-yourself-a-party thing is fabulous!  Can't wait to eat do it again!

Sunday, May 13, 2012

Petal Cake

I love Mother's Day!  Partially because I get presents, partially because my hubby preps all the food all day and changes every single diaper all day (which doesn't matter now, but a few years ago it sure did!), plus I can take a 3 hour bath if I feel so inclined.  Haha!  Really though, I always feel very cherished and appreciated on Mother's Day by my hubby and children, and that is the best gift of all.  I hope I make my mother feel the same way.


My hubby announced that this year we would be going over to my parents' home in the afternoon, and he and my brother would be taking care of the meal.  I offered to make dessert since I have been lusting after all the fabulous cakes I have been seeing (and pinning!) on Pinterest.  

{Check out my food Pinterest board here.}

I had a plain fondant cake in mind with a lovely ruffly flower perched on the very top.  The sides were going to be super smooth and crisp looking with a ribbon tied around the base.  Of course, I decided to try a new fondant recipe.  Usually I make the traditional, over-the-stove with tons of crazy sounding ingredients fondant which tastes okay but not spectacular.  I decided to try marshmallow fondant instead.  It was great up until it came out of the fridge.  The fondant got an attitude and started cracking like nobody's business.  I had already created 14 ruffled flowers for the top "flower mound" that I was envisioning.  So the rest of the scrap fondant became ruffled petals that I stuck all over the sides of the cake.  I thought it looked pretty decent although still too plain.


Then out came my wonderful gold luster spray!  A hit of spray in the middle of each petal, plus a general misting all over, and voila!  I think it looks great!  I can't wait to taste it!  It has 4 alternating layers of french vanilla and lemon cake.  I filled it with lemon curd and vanilla buttercream.  Yummy!

Special thanks to my hubby who rearranged the fridge to fit the cake inside!  Love you baby!!  :)

Happy Mother's Day!


Friday, October 14, 2011

Apple Cinnamon Streusel Muffins


INGREDIENTS
1.5 cups flour
3/4 cup white sugar
1/3 cup milk (approx)
1/3 cup oil
2 large apples, peeled, seeded, and minced
1 egg
2 TBSP cinnamon
2 tsp baking powder
1/2 tsp salt

DIRECTIONS
1. Preheat oven to 400 F.  Line muffin tray with muffin cups and lightly spray with Pam.
2. Combine flour, sugar, cinnamon, baking powder, and salt until well blended.
3. In a 1 cup measuring cup, add oil and egg.  Slowly add enough milk to bring the liquid level to the 1 cup line.  Pour into the flour mixture and blend well.

4. Blend apple pieces in and mix until apples are thoroughly dispersed through muffin mixture.

5. Fill muffin cups almost to the top.  

Add streusel to the top of each muffin.  

Bake 20-22 minutes until lightly browned, or until done.


STREUSEL INGREDIENTS
1/3 cup flour
1/3 cup brown sugar
1/3 cup oats
scant 1/4 cup soft butter
1 tsp cinnamon

Blend all ingredients together until it resembles a coarse mixture.  Add more flour by the tablespoon if needed.
 
 Linking up with some great parties!

Sunday, September 4, 2011

Slice and Bake Cookies

I made a double batch of oatmeal chocolate chip cookies the other day but, because I was in a rush, I did not have time to bake all the dough.  I decided to freeze the extra for almost instant fresh cookies at a later date.  Plus, it saved me from eating it raw... you know how it goes!

First, spread out your wax paper and place several spoonfuls of dough in the middle.

Next, form the dough into a log shape.  This way, you will be able to slice it and bake it!


Wrap the wax paper tightly around the dough, secure with a piece of tape wrapped all around, and label it.  Then freeze for later!

Linking up with some great parties!

Friday, August 26, 2011

How to Use a Mortar & Pestle

One of my favourite kitchen tools is my mortar & pestle.  You can use it to crush nuts, herbs, cookies, etc., into large chunks or small bits.  I especially like using it for crushing rosemary in the fall.

The mortar is the bowl and the pestle is the crushing implement.  Depending on what brand you purchase, your pestle may look like a small club or baseball bat.

Here is my easy step-by-step:

First, place your ingredient in the middle of the bowl.
 

Press down into the middle of the bowl to break up large ingredients.  For small ingredients like herbs or nuts, press down several times all over.  (This Oreo has been pressed one time.)
 

Determine your desired size and crush again as needed.  The Oreo cookie only took 2 or 3 gentle crushes to get it to this point.  If I crushed it any more, it would be crumbs.  For herbs, I like to run the pestle around the bowl, pressing it down hard. 
 Linking up with some great parties!

Tuesday, August 23, 2011

Butterscotch Squares

This was, and still is, one of my most favourite basic un-chocolate brownie/square recipes of all time.  It is butterscotch perfection just by itself or can be a canvas for more adventurous baking.

My recipe card is splattered with bits and pieces of this recipe, but is thankfully still readable!

INGREDIENTS
1/2 cup butter, melted
1 cup brown sugar
1 egg
1/4 tsp salt
1 tsp vanilla
1 cup flour
2/3 cup chopped pecans (optional)


DIRECTIONS

1. Preheat oven to 350F and spray 8x8 glass pan with Pam.

2. Beat butter and brown sugar together for 1 minute.  


3. Add egg, salt, vanilla and mix thoroughly.  Blend in flour and pecans if using.


4. Spread batter into greased pan and bake in centre of oven until the middle is barely moist (test with toothpick). 

5. Inhale deeply and try to keep your hands out of the pan until cool.

6. Cut into squares and enjoy!!

What else can you do with these?
- blend in chocolate chips or Skor pieces in place of nuts
- drizzle chocolate over plain, baked squares
- crumble over vanilla ice cream and top with fudge sauce and peanuts
- make an ice cream sandwich
- sprinkle with marshmallows and chocolate chips, place under broiler until chocolate is melted and marshmallows are puffed and brown for a butterscotch twist on rocky road brownies

Got any other ideas?

Linking up with some great parties!

Monday, February 28, 2011

Millenium Falcon Cake

I think I had heard of Star Wars once or twice before I met my husband.  Now I am quite well acquainted with it, in my opinion. Haha!  I have only been forced to managed to watch Episode 4 though.  Or whatever number was the first one ever made.  My hubby has passed on his Star Wars love to our son, who decided that it would be a great (ie. super galactically fabulous!) theme for his birthday party.  So here is how I made his cake...

Step one:
Trace your outline onto plywood or other base.


Step two:
Cover the entire thing in tinfoil.  We don't want any slivers in the cake!!  I put a ruler on top just so you can see the size of this thing!


Step three:
Bake cakes, and cakes, and more cakes.  This took FIVE cake mixes to cover!!  Then whip up some buttercream (I made three batches of cream cheese buttercream tinted grey) and start covering the cake.  Make sure you build it up in the middle.


Step four:
Make your fondant and start covering everything.  You may want to cut out some additional pieces for some areas to give more of a 3D look.


Step five:
Now for the time-consuming stuff!  Everything up to this point is the quick stuff.  Yeah, right!  No, seriously!!  Start decorating!  I used red, blue, and black gel colours to paint some areas of the cake.  Let the gel dry a bit before piping your icing.  I made a royal icing recipe to ensure everything hardened up and stayed beautiful!  So pipe, pipe, and pipe some more!  When you are done piping, go back and pipe more.  Trust me.

Also, it helps if the cake is sitting up off your table.  Notice mine is sitting on top of bowls flipped upside down.  Having it up in the air helps you decorate all the way to the bottom.


Step six:
Let it dry overnight.  This will be helpful especially for the gel colours.


Step seven:
Now deliver to party site and admire!  We had to lay ours flat for delivery and I ended up not raising it back up off the table.  But no one minded that at all!  Here are some close ups!


PS  If you are wondering how long this took, I started in the afternoon and had some breaks.  Plus baking time (I only baked one cake at a time and had to bake five).  I finished up somewhere around midnight.  Yes, I really love my kids! :)


Linking up with some great parties!

Friday, February 25, 2011

Crazy Pink & Green Cake

Last year, I made a cake for my friend's birthday.  She is a super fun girl, so we had to have a super fun cake.  I was thinking of those cakes that are all off-kilter, and wanted to try my hand at that.


Crazy layered cake - lime and vanilla flavoured layers with cream cheese frosting and raspberry flavoured fondant.  Add in some coloured sugar, feathers, and pinky pearl luster dust, and this is what we get:


Tuesday, December 21, 2010

DIY Baking Mix Gift

Here is a super cute, last minute gift that you can make yourself with supplies you likely have in your pantry and gift wrapping room. (What? No gift wrapping room? Me neither. Next house, I guess!)

What you need:

Dry ingredients
Cellophane bags (I used cone-shaped)

Curling ribbon

Card stock


Optional:
Gift bag

Tissue paper


Instructions:

1. Find a favourite recipe, mix dry ingredients, and pour into cellophane bag. Use a twist tie to close bag tightly. Use lots of curling ribbon!

2. Type out baking instructions and print on card stock.

3. Attach recipe to curling ribbon. Ta-da! Great gift for all!
4. Optional: place in gift bag and cover with tissue paper. Good idea for those traveling so nothing in the car pierces the bag!


My recipe is my go-to favourite shortbread recipe from here. I printed four recipes to one sheet of card stock. Practically zero cost, very thoughtful, and definitely something the receiver will enjoy!


Saturday, September 11, 2010

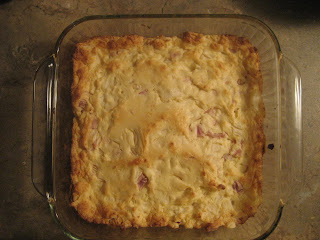
Hot Sweet Onion Dip

I got the base of this recipe off a bag of sweet onions (who knew?) and absolutely adore it! Hot, cheesy, oniony goodness! The smell of the dip baking in the oven is perfectly fall; it pairs perfectly with sweaters, coloured leaves, and the smell of bonfires in the crisp night air. It just makes you smile! I also love to serve this dip at our Christmas parties.

I amend my recipe depending on what I have in the pantry, so here is my most recent version. Feel free to vary the cheese amounts as well!

INGREDIENTS
2 large onions (I only had 1 large onion, so I substituted 5 French shallots for the other onion)
2 cups Miracle Whip
1 package Philly cream cheese, at room temp
1 cup shredded parm cheese

DIRECTIONS
1. Preheat oven to 350 degrees F.
2. Chop onions (penny size pieces or smaller).
3. Blend Miracle Whip, Philly, and parm together. Add onions.
4. Place into 8x8 glass baking dish and bake for approximately 30 minutes or until top is lightly browned and bubbling gently around the edges.
5. Best served hot! Use French bread or sourdough to dip (crackers will work too).


Thursday, August 12, 2010

Williams-Sonoma "The Great Cupcake Pan"

My parents gave me this cute giant cupcake pan for my birthday. My kids wanted to go home immediately and bake! Typical. (Mommy was pushing for that, too!) I usually don't make cakes from scratch since they are generally heavy or dense. My hubby really likes the cake mix cakes because they are light and fluffy, so very few from-scratch cakes happen at our house. The cupcake pan comes with a recipe that is super. Fabulous. Awesome. Amazingness. Not heavy. But not airy light. Just somewhere in the middle of perfection! I'm not going to type it out - way toooo long!! I'd be typing til next Tuesday...


I followed the recipe exactly (hey, there's a first time for everything, right?!) and it turned out wonderfully. The giant cupcake dropped out of the pan perfectly. No pieces to mend, no missing spots, just gorgeousness in a cake. Can you tell it was a wonderful experience? Ha ha!

The only thing I would try differently next time is in the assembly of the cupcake. The directions tell you to place the top of the cupcake back into the pan, level it by cutting with a serrated knife, and cover the cut side of the cupcake with buttercream. Then you are supposed to flip the base over and lay the cut side down onto the buttercream. This means buttercream is sandwiched by both leveled sides of the cupcakes. This worked alright, but after chilling, it did not drop out of the pan until it warmed up a little bit. So next time, I may just assemble it on a cake plate, right side up of course.


We are now waiting impatiently for hubby to get home so we can demolish sample it.

Tuesday, August 10, 2010

Music Note Cake Pops

My son's school had a music night a while back and I volunteered to bring something for the food portion of the evening. Of course, I can't do something that someone else may bring. I have to be unique - maybe this is the Type A in me?

Anyway, so I made cake pops (thanks to
Bakerella for inspiration!) but not in the conventional way. I baked a vanilla cake mix that I tinted Tiffany blue (I was testing the colour for another cake - more on that one later...) and then smashed it all up. Add in some cream cheese frosting and we're ready to go.

I rolled the mix into small balls and inserted a stick into each one. After dipping each one in melted chocolate, I set them upside down on parchment paper with the stick up in the air. Some sprinkles and such were added, and then I piped some royal icing around each stick for extra stability.


The next morning, I flipped the cake pops over and stuck them in my styrofoam board. I piped a dark chocolate ganache circle onto the base (now the top) of each cake pop. While the ganache was still setting, I gently laid the music notes on top. (It is possible that I broke almost as many music notes as I used. No telling though. Those are super duper fragile little things!!)

Needless to say, they ended up being used at the fundraiser table instead of the food table, and not one was left. I didn't even get one. :( Oh well, maybe next time.


Tuesday, July 27, 2010

Best Ever Banana Muffins / Banana Bread

My husband told me that once you have made a recipe a certain number of times, you don't have to give credit to the person who gave you the recipe since it is now adopted as your own. I like this philosophy! Haha! Well, it has had some changes from the original, so I suppose it really is my own recipe now! :)

INGREDIENTS

2-1/2 cups flour

1 cup sugar

2 tbsp baking powder

1 egg

1/2 tsp salt

3 tbsp oil (I use olive or grapeseed)

3/4 cup milk

4-5 mashed bananas (4 if large size; 5 if medium)

1 - 1-1/2 cups chocolate chips


DIRECTIONS
1. Preheat oven to 350 degress F.

2. Mix first 8 ingredients together - leave slightly lumpy. Stir in chocolate chips.

3. For BREAD: grease and flour pan, and bake for 55-65 minutes. For MUFFINS: use muffin liners and spray lightly with Pam; bake for approximately 20 minutes.
Makes one loaf pan, 18 large or 20ish medium muffins.

Super light, moist, fluffy, and full of chocolatey goodness! Enjoy!


Saturday, July 24, 2010

Quick & Easy Peach Freezer Jam

I love peach and I love freezer jam. I prefer freezer jam to cooked jam, mostly because the fruity flavour of the freezer jam is the closest match to the fresh fruit flavour.

Making freezer jam is super easy - mash the fruit, add the sugar, boil the pectin, stir, and pour into jars. That's it. You can easily make freezer jam in under 30 minutes, including the fruit prep.


INGREDIENTS
For peach:

2 lbs peaches (2-1/4 cups prepared fruit)

1 lemon (I used 2 tbsp bottled lemon juice instead)

5 cups white sugar


DIRECTIONS

Follow the instructions in your package of pectin. These were my instructions:

Pre-prep: Prep glass jars by washing and scalding (easy way to scald is to submerge the jars in boiling water on the stovetop). Dry fully.

1. Peel
peaches.
2. Prep fruit by pitting and finely chopping/grinding. (Do not use a food processor. You can use a potato masher - I didn't have one of those so I used a pastry knife.)
3. Measure fruit, add lemon juice, and stir in measured sugar.
4. Mix well and let sit for 10 minutes.

5. Add fruit pectin to 3/4 cup water; bring to hard boil (a boil you cannot stir down) for one minute, stirring constantly.

6. Remove from heat; add fruit and sugar, and continue to stir for 3 minutes.
7. Jam texture should be similar to gelatin that is beginning to set.

8. Immediately pour into jars, leaving about 1/4" room for expansion during freezing.
Let stand at room temp for 24 hours before freezing.


Note: If jam will be used within 2 or 3 weeks, you can store in the fridge instead of freezer.

Tuesday, July 13, 2010

How To: Easy Way to Peel Fruit

I have been wanting to make jam since last year and was completely committed to making it happen this year! No more slacking!

In order to make the jam (peach this time around!), the fruit has to be peeled, and who wants to spend lots of time with their paring knife? Not me. Here is what I did...


Step 1: Gently cut a large X in the bottom of the fruit. (This is where the skin will begin to pull away from itself.) Get a medium sized pot of water boiling.

Step 2: Place the fruit in the boiling water for a couple of minutes. Different fruits may take different amounts of time. I left the peaches in for approximately 2-3 minutes.

Step 3: Remove the fruit from the boiling water. Check the X in the bottom - if it has spread apart or is already peeling, you are good to go!

Step 4: Immediately place the fruit in an ice bath. Several ice cubes in a bowl of cold water will do the trick. Leave in for a minute or so, as this will finish the blanching process.

Step 5: Remove fruit and peel off the skin. It should come off very easily and in large pieces. Most of my peaches needed only 4 pieces removed to skin the entire fruit. (I usually leave each fruit in the water until I can peel it as I don't like them to dry.)

Step 6: Repeat Step 5 until you are all done. Then, on to your recipe!

Note: Some of my X's were a little deeper than I would usually cut. Not to worry though, as this should not affect the fruit or the recipe.

This method of peeling works well with peaches, plums, tomatoes, nectarines, apricots, etc. Happy peeling! :)

Monday, May 24, 2010

Best Ever Homemade Salty Breadsticks

I don't usually eat bread (or buns, etc.) with dinner. UNLESS, they happen to be my salty breadsticks - so perfect for dipping in soups or stews and equally as wonderful for mopping up pasta sauce! Swoon!! I have been making these since I was a teenager...

INGREDIENTS (makes about 18 sticks)
1/4 cup butter
1-1/4 cups all purpose flour
1-1/2 tsp sugar
2 tsp baking powder (sometimes I throw in a little extra!)
1 tsp salt
2/3 cup milk
sea salt / coarse salt


DIRECTIONS
Heat oven to 450 degress F. Melt butter in 9x9 glass pan.

Use a fork to mix all dry ingredients (except sea salt) together in glass or plastic bowl. This should not take more than 40 strokes (if you want to count!), so look for it to come away from the sides of the bowl and cling together.


Sprinkle flour on your flat surface. I generally just use my bare counter since it wipes up quite easily. Dump out the dough, sprinkle it with flour, and knead lightly about 10 times. You want the dough to lose its stickiness and become elastic.


Get your sweet lil kitchen helper to roll out the dough. (I like to use a marble rolling pin because of its cold temperature.) Roll out the dough to a circle about 10-12 inches in diameter. It should be about 1/2 - 3/4 of an inch in thickness.


Using a sharp cutting knife, cut the dough in strips and then down the centre. The dough will be sticky on the cut edges so you will want to work quickly now. Prop up your pan on one side so the melted butter pools at one end. Submerge a piece of dough in the butter, turning to coat on all sides. Place the dough at the opposite side of the pan as the butter. Repeat until all dough is coated in butter. You may need to tilt the pan to evenly redistribute any remaining melted butter throughout. Sprinkle your sea salt (or coarse salt) over the dough and pop it into the oven.


And 15-18 minutes later, you should have a wonderfully golden brown pan of goodness. See the butter bubbling in there?!? That is some kind of wonderful, right there! I like to let the breadsticks sit for a minute, and then I turn them over so any little bits of salt or butter can soak into the top. Serve immediately.


Baking Tip: Using an herb-infused sea salt on the top before baking is super fabulous! I made my own by covering fresh herbs completely in sea salt and letting it sit for a month or so. My fave salt flavours for these breadsticks are rosemary and thyme. Enjoy!! :)

Related Posts Plugin for WordPress, Blogger...