Wednesday, December 22, 2010

Use Cardboard Rolls for Wrapping Gifts

I made a lot of jewelry for gifts this year and instead of buying jewelry boxes, I used cardboard tubes. Toilet paper tubes are the perfect size and paper towel tubes would work well too.


Wrap your small gift in tissue paper and place inside cardboard roll. (A magazine rolled inside a long tube would be great!)


Place roll on wrapping paper and tape in place.


Roll up, tape, and leave ends open. Use curling ribbon to tie off each end.


Add lots more curling ribbon! I think this is so cute - it looks like a huge wrapped candy! :)


Tuesday, December 21, 2010

DIY Baking Mix Gift

Here is a super cute, last minute gift that you can make yourself with supplies you likely have in your pantry and gift wrapping room. (What? No gift wrapping room? Me neither. Next house, I guess!)

What you need:

Dry ingredients
Cellophane bags (I used cone-shaped)

Curling ribbon

Card stock


Optional:
Gift bag

Tissue paper


Instructions:

1. Find a favourite recipe, mix dry ingredients, and pour into cellophane bag. Use a twist tie to close bag tightly. Use lots of curling ribbon!

2. Type out baking instructions and print on card stock.

3. Attach recipe to curling ribbon. Ta-da! Great gift for all!
4. Optional: place in gift bag and cover with tissue paper. Good idea for those traveling so nothing in the car pierces the bag!


My recipe is my go-to favourite shortbread recipe from here. I printed four recipes to one sheet of card stock. Practically zero cost, very thoughtful, and definitely something the receiver will enjoy!


Monday, December 20, 2010

One Garland, Five Ways

I have used a swath of fabric instead of a traditional garland for three Christmases now, and I love it so much that it stays up year round (minus the decorations)!

All Season Style
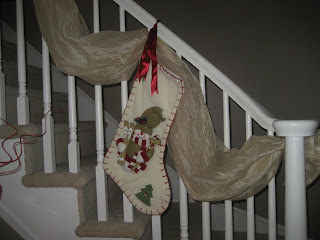
Here she is, in all her wonderful splendor! The fabric is a dark ivory crushed sheer satin, and I originally used it as a super long curtain swag. I used little bits of ribbon to tie it to the staircase.

Vintage Christmas Style
This wreath is a dark ivory bottlebrush-style base with small penny-sized red bulbs. Add a ribbon for a touch of flair and to match your Christmas style. Gingham is perfectly vintage-y!

Classic Christmas Style
Nothing says classic Christmas like snowmen and stockings with giant stitching! This is my son's stocking and it looks super cute hanging with the fabric. Some dark red satin ribbon ties it up on the staircase. So festive!

Transitional Christmas Style
I bought these 3D stars several years ago at Pier 1 Imports. These stars get used in a different way every Christmas - this year, I have a gold star as a tree topper! I love that they can be used so many ways and match so many styles. Use a bit of ribbon to tie them to the staircase and add some punchy ribbon behind to match your colour palette.

Contemporary Christmas Style
I absolutely adore these fluffy feather balls! I bought them last Christmas and they have been living in a large vase ever since. I had just enough to go on each swag! I love it!! This one may be getting a repeat performance next year!

Wednesday, October 20, 2010

DIY: What's Old Is New Again: Crepe Paper Party Decor

I am pretty sure that the last time I had crepe paper at a party was when I was about 3. I have never really used it for anything but my friend begged me on her hands and knees asked me to help her do a 65th birthday party for her mother. On zero budget.

So out came the crepe paper from the dollar store and here is what I came up with. I am calling it my "Crepe Paper Installation" since that sounds so artsy and fun!! Ha!

Here is a close up. All you have to do is cut matching lengths of crepe paper and tape them side-by-side. The wood is actually doors to a white board behind it - the crepe paper on the left door is all twisted one way, and the paper on the right is twisted opposite. I love how it turned out!


I am linking up with these parties!

DIY Custom Bling Card

Supplies:
1 package plain cards (mine came in an 8-pack for $1)
1 package adhesive rhinestones ($1)

Time:
20 minutes

Directions:
Just attach rhinestones to your card in a decorative pattern!

I made a crazy-looking 'M' on the envelope for the recipient's initial, and a '65' on the card for her age. Add a sweet, personalized note inside and you have a gorgeous, one-of-a-kind card!


I am linking up with these parties!

Last Room Painted!

We bought our home from plans. The colour palette from which to choose left us more than a little discouraged, but for the bargain price of $200 extra PER room, we could have any colour we wanted.

Ummmm, no thanks. I can paint myself, thankyouverymuch.

And last week, we finished our last room!! Our bathroom! Here is my very fabulous hubby cutting in all the corners and edges.


I painted the first coat after he finished, with some assistance from my handsome helper!


And the after!


All I have to do now is decorate it! And buy new towels...

Monday, October 11, 2010

Nemo/Panda/Polar Bear Orange Bedroom

Nemo and pandas generally don't go together. Never mind about polar bears added to the mix as well! But my friend's 9 year old daughter loves them all equally so I was determined to pull the 3 all together into a gorgeous bedroom.

This bedroom was much harder to initially begin than the other one. We started with an underwater idea (because of Nemo). Then that idea was tossed out to sea (knee-slapping jokester here, I know!) and we turned to a wildlife/jungle/bamboo idea. Again, no go.

As I was trying to get these animals together in my head, I thought that we should perhaps take a different approach. Bright creamsicle orange for the room with black and white accents everywhere, and somehow the 3 creatures will fit in. I hope. All together. Errgggghh.

Luckily, her daughter went for the idea and is madly in love with orange. Her last bedroom was orange as well.

Here is the paint:
And here you can see an inspiration pillow that will give you a clue as to the remainder of the room:


More reveal coming!

Friday, October 8, 2010

Purple Princess Bedroom

As I have mentioned previously, I am helping a friend decorate her new home. She has two lovely daughters, ages 7 and 9, and first up on the decorating list was their rooms. These two girls are super different in their tastes, so we knew that there would be no (a) paint color sharing, (b) style sharing, or (c) fabric sharing.

The younger girl wanted a princess feel and her mom wanted it to last several years (i.e. "big-girl-princess-turning-tween-princess"). So we didn't go crazy with Belle, Ariel, Cinderella, Jasmine, Snow White, and Aurora (all nice girls, I'm sure!). First thing was to choose a fabric for the curtains. Originally, the 7 year old wanted pink since her previous room had a purple satin "Southern Charm with ruffles" feel. However, we found a gorgeous, light embroidered white cotton with purple, teal, lime, and dolphin grey flowers. Super gorgeous! But no pink to be found. And she loved it! So pink was out and purple was in!

Another thing to consider: we were trying to keep this room makeover as budget-friendly as possible. That meant the purple satin bedding was staying as well as the hand-me-down (but in wonderful shape) bedroom suite in dark cherry wood.

We decided to go with a grey-lavender wall color. The crisp white embroidered fabric was sewn into curtains (way to go, ME!) and a duplicate set of purple satin sheets was also sewn into curtains (once again, way to go, ME!) - one white and one purple per window side.


The curtains don't have enough tabs at the top yet, but at least you get the idea...

Stay tuned for more!!

Tuesday, September 21, 2010

Mod Podge Virgin

So I had never used Mod Podge before, but I had a special job that only it could handle. I think I have mentioned before that I am helping a friend decorate her entire new house. That now includes making two message boards, one for each of her girls to hang in their rooms. (Reveals to come soooon!!)

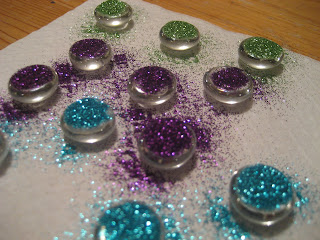
For one of the message boards, I bought cute little buttons to hide the tacks but I didn't have enough. Mod Podge, glitter, and clear round stones to the rescue!

Step One: Apply Mod Podge to flat back side of stones.

Step Two: Dust with glitter. Let dry overnight. (I don't know if it needs to be this long but I did mine late at night, so the overnight dry time just worked out that way!)

Step Three: Attach to whatever you wish! These would make super cute fridge magnets if you glued a tiny magnet to the back of each one!


Monday, September 13, 2010

Fresh Guacamole

Guacamole is one of my most favourite things ever! So easy, so fast, soooo good for you! Did you know that avocadoes are good for "women's health"? Yes, they promote a healthy reproductive system. And it is kinda cool, too, because an avocado supposedly takes 9 months from start to finish just like a baby! At least, that's what I've heard. I haven't wikipedia'ed it or anything. Ha!


INGREDIENTS

handful cherry tomatoes (thank you, garden!)

handful cilantro leaves

1 French shallot (I didn't have a regular onion)

3 avocadoes

squirt or 3 of lime juice


DIRECTIONS:

1. Cut the avocadoes in half. Remove the pits. Use a fork to mash up the avocado while the flesh is still in the skin. Using a spoon, scoop out the mashed flesh. (Sorry, forgot the pic for this one.)


2. Chop tomatoes finely. I used a mini food processor for the tomatoes.


3. Chop the onion and the cilantro. Put everything into a mixing bowl and add some lime juice.


4. This is cheating and not authentic at all, but I like to throw in some sour cream - maybe a half cup or so - for some extra creamy goodness.


5. Mix everything together and add more lime juice if necessary. You want to be able to taste the brightness of the lime!


This is where I usually stop unless my hubby is hankering for some heat. In that case, I will also add cumin, jalapeno, hot pepper powder, spices, etc. The fresh, non-heat version is my favourite though.

Saturday, September 11, 2010

Hot Sweet Onion Dip

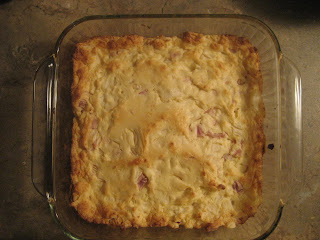
I got the base of this recipe off a bag of sweet onions (who knew?) and absolutely adore it! Hot, cheesy, oniony goodness! The smell of the dip baking in the oven is perfectly fall; it pairs perfectly with sweaters, coloured leaves, and the smell of bonfires in the crisp night air. It just makes you smile! I also love to serve this dip at our Christmas parties.

I amend my recipe depending on what I have in the pantry, so here is my most recent version. Feel free to vary the cheese amounts as well!

INGREDIENTS
2 large onions (I only had 1 large onion, so I substituted 5 French shallots for the other onion)
2 cups Miracle Whip
1 package Philly cream cheese, at room temp
1 cup shredded parm cheese

DIRECTIONS
1. Preheat oven to 350 degrees F.
2. Chop onions (penny size pieces or smaller).
3. Blend Miracle Whip, Philly, and parm together. Add onions.
4. Place into 8x8 glass baking dish and bake for approximately 30 minutes or until top is lightly browned and bubbling gently around the edges.
5. Best served hot! Use French bread or sourdough to dip (crackers will work too).


Monday, September 6, 2010

Two Eggs and a Penny

So sorry for the lack of posts recently. My laptop (which is was where I did all my work and blog posts) got stolen and I have been in mourning for the last two weeks. I loved my laptop sooo much. It was a MacBook Pro, and until I got it, I was an Apple virgin. Now I can't imagine using anything else. (No, Apple is not paying me to say this!)

So needless to say, I have felt completely backwards without it. Right now I am typing this on our old dinosaur computer whose main function is to play opera all night long for the kids. (We particularly like Andrea Boccelli, Sarah Brightman, and Josh Groban. Anyway.)

I was so excited to get my Little Pretties Luxe etsy shop up and running, but my laptop had all my pictures on it. So now I have to reshoot all 100+ items. Big fat bummer. Plus I had a ton of DIYs almost ready to go, so I feel like I am starting from scratch. Blah.

And onto happier subjects... I was making scrambled eggs the other morning and just had to so you all a picture of the giant eggs I had. I know someone who works on a chicken farm (egg farm?) and they give me a bunch of the eggs that are too big for general sale. Almost all of the giant eggs are double-yolkers. Macho eggs.

So here we are from left to right:
the giant egg a store bought egg in "large" a penny for comparison


Monday, August 16, 2010

Etsy is Up!

Well, it is taking longer than I anticipated. Then again, my hubby tells me that I tend to underestimate time... But at least it is up!

I have over 100 items to list, so hopefully by September they will all be up! Ha! For now, here are a few...

Introducing Little Pretties Luxe on Etsy!

Etsy
littleprettiesluxe


Find me on Facebook and become a fan! Thanks! :)

Fast & Easy DIY: Blinged Napkins

Supplies:
Napkins (or serviettes as my mother says)

Mini sticky gems


Directions:

1. Determine number of gems per napkin. I did three on mine.


2. Stick gems on napkin.


3. Repeat.


So cute!


Sunday, August 15, 2010

DIY: Glam Card Box

Supplies: 1 large card box (available at party/craft stores)
mini sticky gems (available at dollar stores or craft stores)
ribbon
lighter or lit candle
glue gun

Instructions:

1. Assemble card box according to instructions. Alternately, use your own box (just cover in wrapping paper and cut a large slit in the top).

2. Determine ribbon location. I wrapped my ribbon around the box and cut with an extra inch in length. I then heat-sealed the edges (with a lighter) and began on a side edge, adding a tiny bit on glue on each box corner. Repeat for each length of ribbon. I added bows to each ribbon stripe by making a loop and gluing together. (Sorry, forgot pics of this!) You should be left with a ribbon that looks like the number 8 when looking at it sideways. Then cut a short piece to wrap around the centre of the "8", and glue to ribbon stripes.


3. For the top, lay your ribbon out and cut exact length needed. Seal your ribbon edges, and glue ribbon around box opening. I added bows here too.


4. Affix the sticky gems to box. I used up one colour of sticky gems before I moved onto the next colour to ensure each side of the box got an equal amount. I also added some to the centres of the bows.

5. Admire and sighhhh at your chic box!


Friday, August 13, 2010

Blueberry & Cream Cheese Stuffed French Toast

Sounds complicated, but so easy! Sound tasty? You have no idea; I am practically drooling right now thinking about it!!

INGREDIENTS
4 slices bread
2 eggs
1 tsp cinnamon
cream cheese
handful blueberries

DIRECTIONS
1. Put eggs in shallow pan or bowl and beat with fork. Mix in cinnamon.


2. Arrange cream cheese slices on bread and place blueberries on top of cream cheese. Top with bread slice.


3. Dip outer sides of bread in egg mixture.


4. Place in hot frying pan (sprayed or greased) and cook on both sides (about 3-4 minutes per side).
5. Remove from heat; cut in half and arrange on plate.
6. Drizzle with blueberry compote and maple syrup. Top with fresh blueberries.


with maple syrup added


Wow!! So goooood!! Enjoy!

Blueberry Compote

Compote is basically smashed up fruit plus water plus sugar. With all the blueberries we had, this was a tasty and easy way to use up a bunch of them!

INGREDIENTS

3 cups blueberries

2/3 cup water

2/3 cup white sugar

1-2 tbsp cornstarch

2 tsp lemon juice


DIRECTIONS
1. Mix together berries, water, and sugar. Simmer on stove until berries burst (about 8-10 minutes).
2. Mix together cornstarch with 1 tbsp cold water. When fully mixed, add to berry mixture. Cook until compote thickens and coats a spoon (about 6-8 minutes).
3. Remove from heat and stir in lemon juice.


Makes approximately 2 cups. Enjoy with yogurt, on ice cream, over pancakes, etc.!


Notes:
1. Add more cornstarch if you want a thicker result. I like to add, cook, and test. Then I add more cornstarch until I get it as thick as I want it.
2. I kept my stove on medium heat and was able to avoid any scorching.

Coming Soon!

(drumroll please...)

I am finally getting my Etsy store up and running! I have had people asking me about this for far too long... Your wish is granted; it is on its way! Hope to reveal tomorrow! (That is, if my fingers
can still type and aren't too burned from all my glue gunning. Is that a word?)

PS Have a happy Friday! It's my second fave day of the week! :D

Thursday, August 12, 2010

Williams-Sonoma "The Great Cupcake Pan"

My parents gave me this cute giant cupcake pan for my birthday. My kids wanted to go home immediately and bake! Typical. (Mommy was pushing for that, too!) I usually don't make cakes from scratch since they are generally heavy or dense. My hubby really likes the cake mix cakes because they are light and fluffy, so very few from-scratch cakes happen at our house. The cupcake pan comes with a recipe that is super. Fabulous. Awesome. Amazingness. Not heavy. But not airy light. Just somewhere in the middle of perfection! I'm not going to type it out - way toooo long!! I'd be typing til next Tuesday...


I followed the recipe exactly (hey, there's a first time for everything, right?!) and it turned out wonderfully. The giant cupcake dropped out of the pan perfectly. No pieces to mend, no missing spots, just gorgeousness in a cake. Can you tell it was a wonderful experience? Ha ha!

The only thing I would try differently next time is in the assembly of the cupcake. The directions tell you to place the top of the cupcake back into the pan, level it by cutting with a serrated knife, and cover the cut side of the cupcake with buttercream. Then you are supposed to flip the base over and lay the cut side down onto the buttercream. This means buttercream is sandwiched by both leveled sides of the cupcakes. This worked alright, but after chilling, it did not drop out of the pan until it warmed up a little bit. So next time, I may just assemble it on a cake plate, right side up of course.


We are now waiting impatiently for hubby to get home so we can demolish sample it.

Wednesday, August 11, 2010

Blueberry Picking!

I am sitting here typing with one hand as I scarf down blueberries with the other. Wow, I love those little things!

Took the kids out blueberry picking today for the first time (them, not me), and they thought it was great! We were the only ones there for the first half of our picking time... guess it was too hot for everyone else! Oh well. More for us!

Now I am searching for out-of-the-ordinary blueberry recipes to use up my 20 cups or so of blueberries! (Did I mention they are super ripe and need to be used or frozen pretty much immediately? Yeah. Lol!)


See that full pail on the ground? There's another in the stroller seat and it is even more full than the first!

The entire field is covered in netting to keep the birds away.


We saw this interesting-looking bird on the way home, just walking along the road. Aren't those polka dots crazy? We were thinking this might be a grouse...

Related Posts Plugin for WordPress, Blogger...